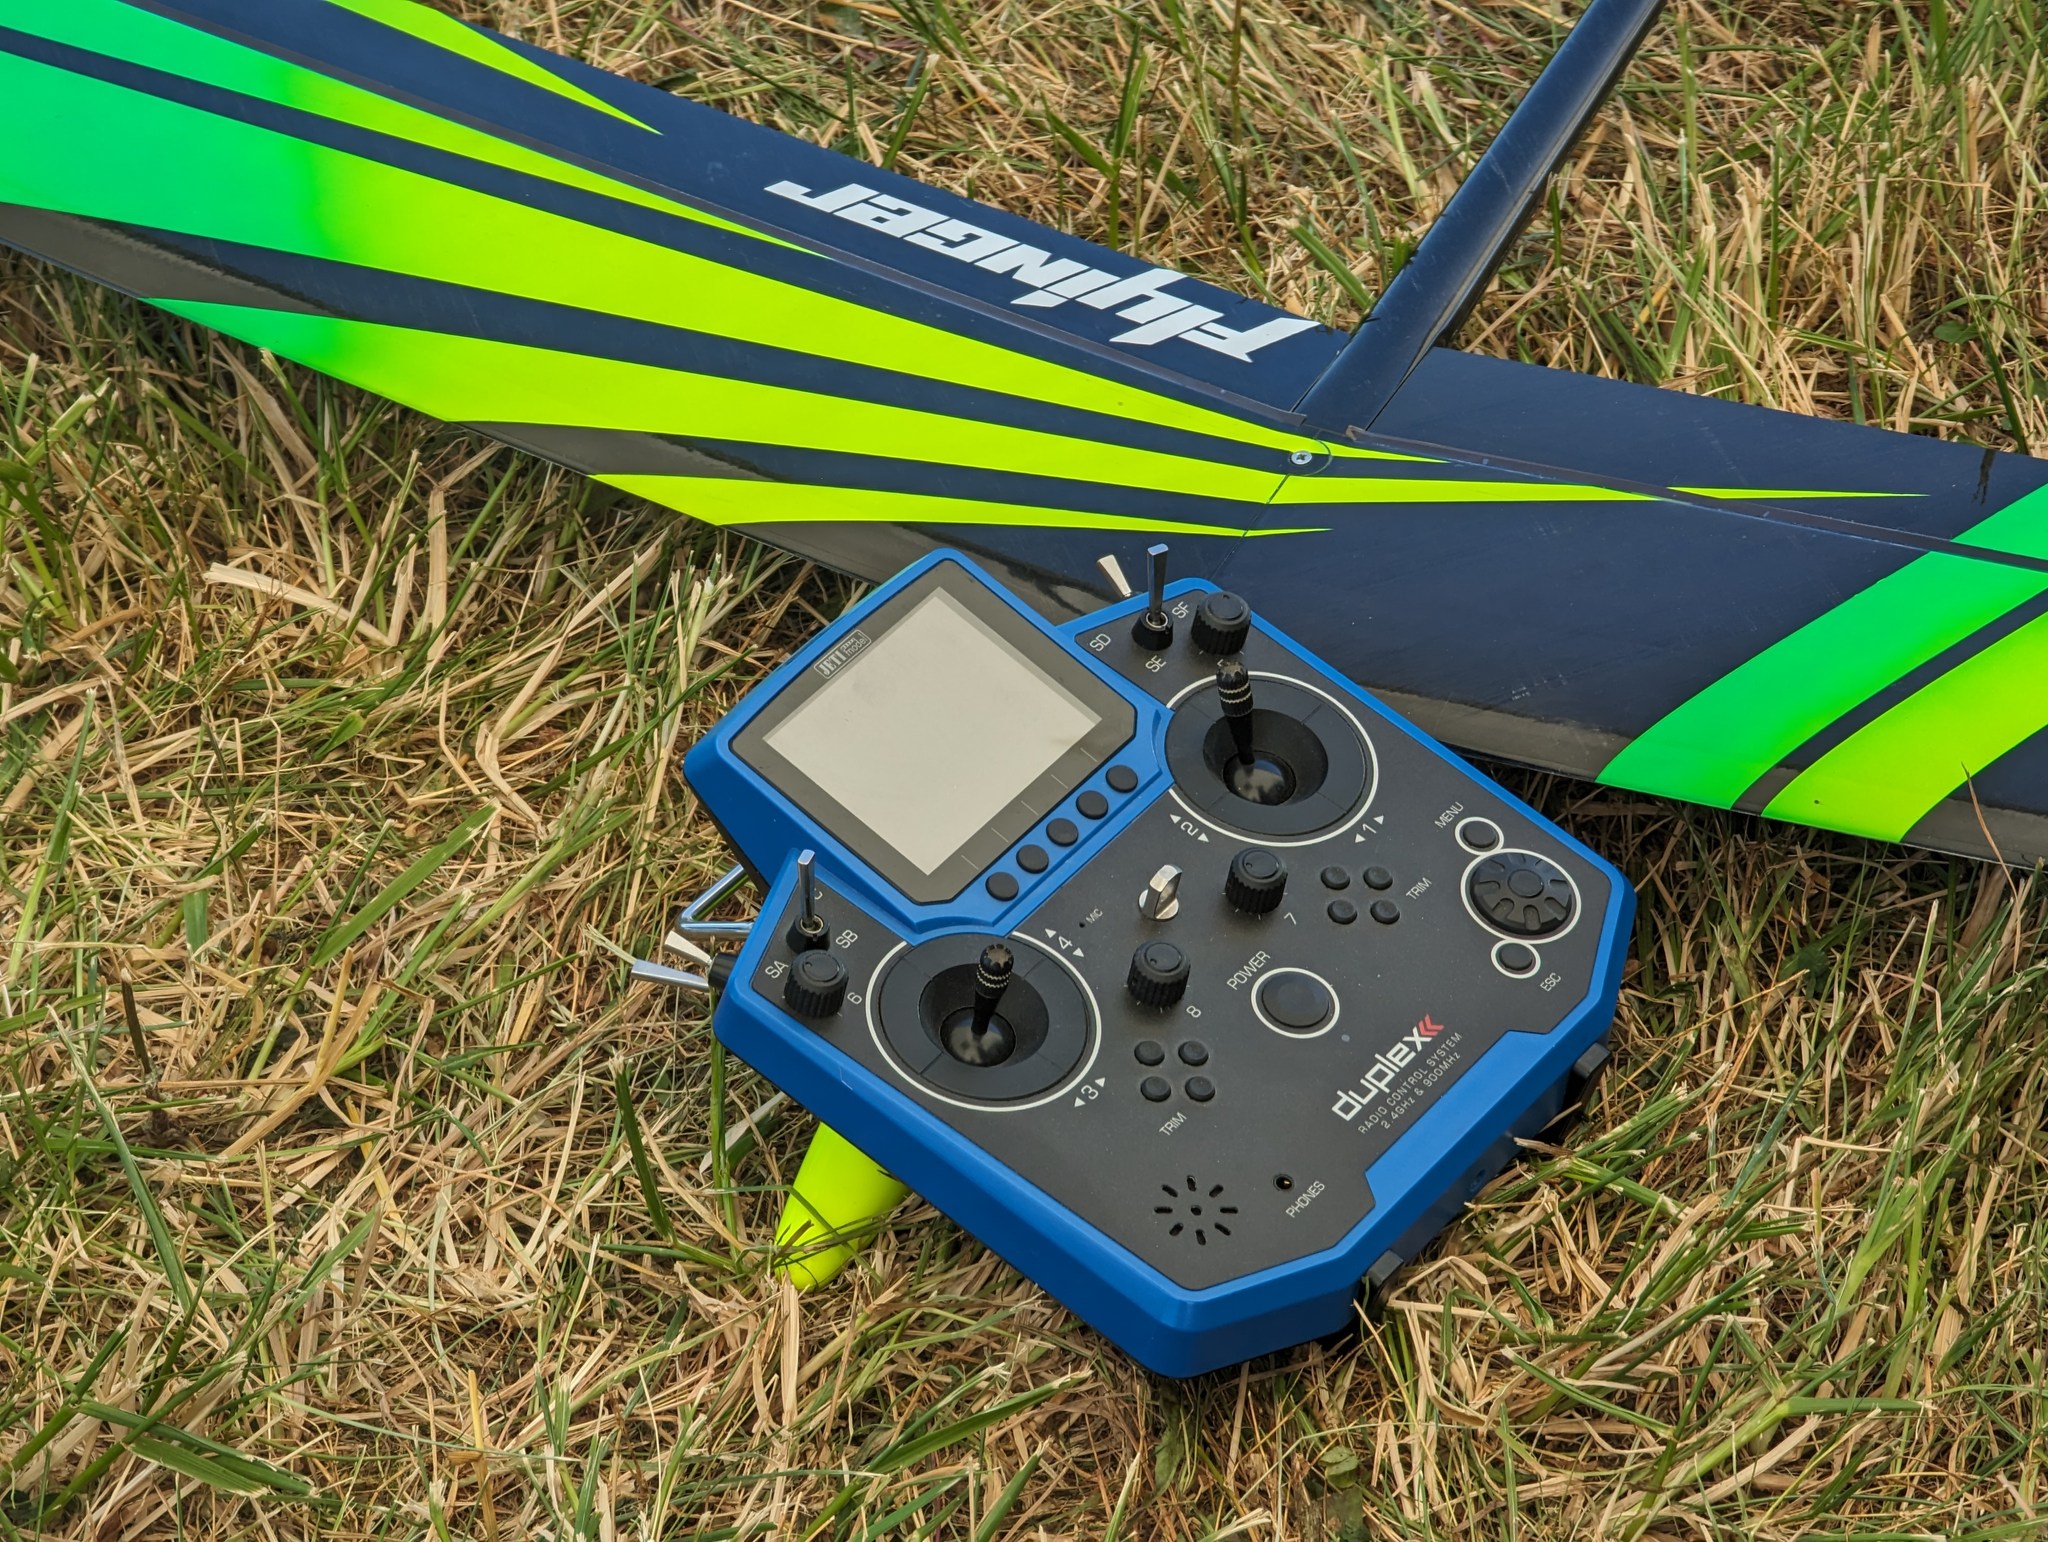
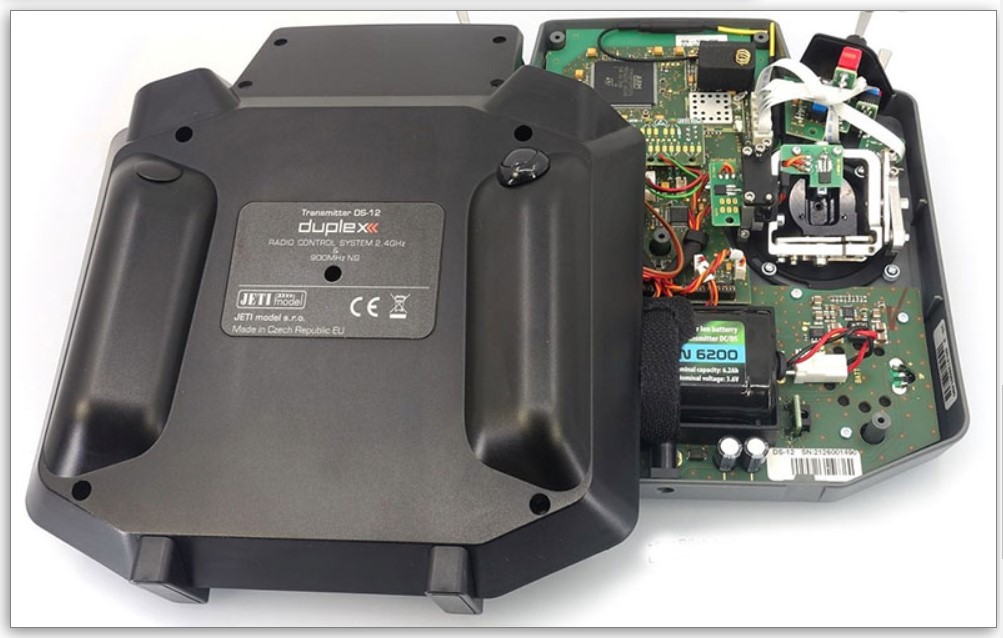
DS-12 Modification in Use
Take a look at how martin Popovsky uses the modified back cover to enhance his flying experience!
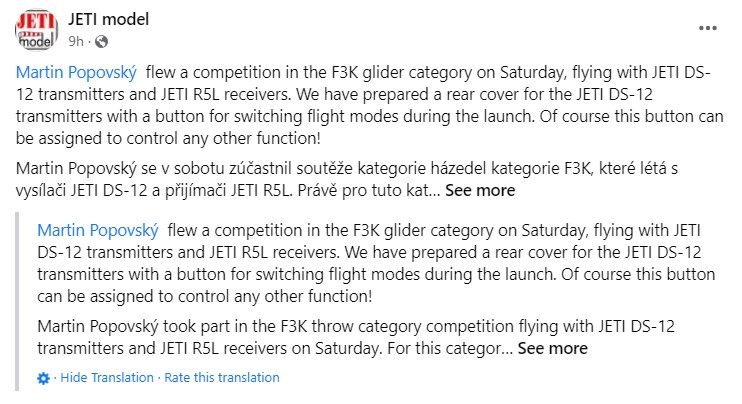
Learn more, including other uses, about the DS-12 Back Cover w/Expander Module MSW, Momentary Button Switch here!


Take a look at how martin Popovsky uses the modified back cover to enhance his flying experience!
Learn more, including other uses, about the DS-12 Back Cover w/Expander Module MSW, Momentary Button Switch here!
Jeti user Robin Trumpp successfully flew his scale Gee Bee R-2 for the first time last month. On his aircraft he runs a Jeti Central Box 210 for his power needs and flies it on a Jeti DS-24! With the MRPM sensor, he can get flight data regarding the propeller speed (RPM) of his model. In addition to his Jeti equipment, Robin is running a Filala/Valach 250 radial engine and Ditex EL 3214 servos. Great job on your successful maiden flight!

The plane Robin is flying is the Gee Bee R-2. This scale model is a replica of the 1932 plane of the same name (Bee Gee R-2). It was built, along with the Gee Bee R-1, as a racing aircraft by Granville Brothers Aircraft. The special design of the fuselage – tear drop instead of straight-tapered – was intended to lower the drag on the aircraft. In order to do this, the fuselage was designed to be wider than the engine. The placement of the cockpit has a special design too. It was placed right in front of the vertical stabilizer to aid in vision during pylon turns. The Gee Bee R-1/2 was known to be a record setter, but also a dangerous plane, unfortunately causing the death of one pilot and injuring another. Despite the unfortunate incidents, many pilots loved how well the Gee Bee R-1/2 flew.
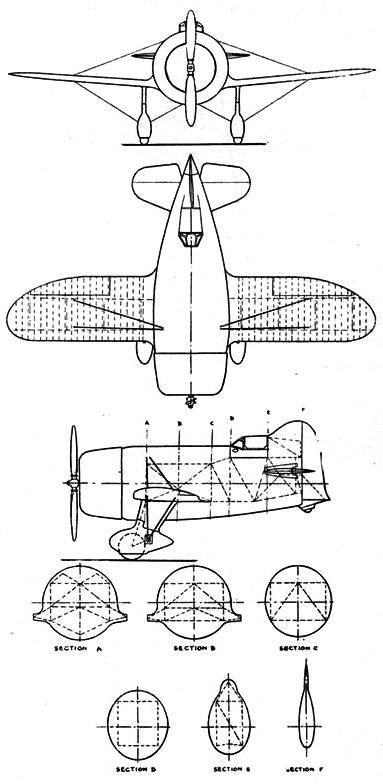
1991, the a R-2 Replica was made by Steve Wolf and Delmar Benjamin. Benjamin flew this replica many times in aerobatic performances at airshows until 2002, when he retired it. It currently is housed in the Fantasy of Flight museum in Orlampa, Florida (Yes, it is a real place!), not to far from our very own shop here in Florida!


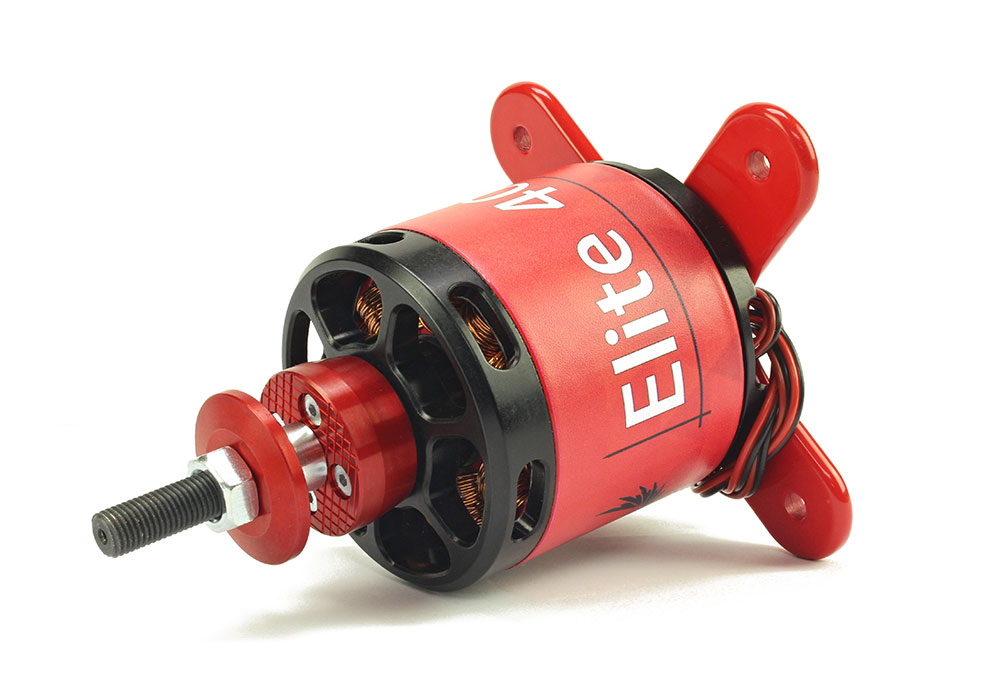
The new Esprit Elite HD Outrunners have a built in telemetry sensor to measure the core temperature of the motor. They are offered in 30cc, 35cc, and 40cc equivalents. Get the telemetry in real time on your Jeti Transmitter screen!
Elite series motors are the culmination of years spent designing and testing in extreme environments. Motors feature hardened steel shafts, built in fans, and a large radial bearing designed to carry the load placed on the open end of the rotor. Elite T125 (Jeti EX, Graupner HoTT, Futaba S.Bus2) micro telemetry sensor is installed in the motor to measure core temperature. These features, combined with an easy to maintain and repair design, promise years of worry free use.
Head on over to the site and check them out!


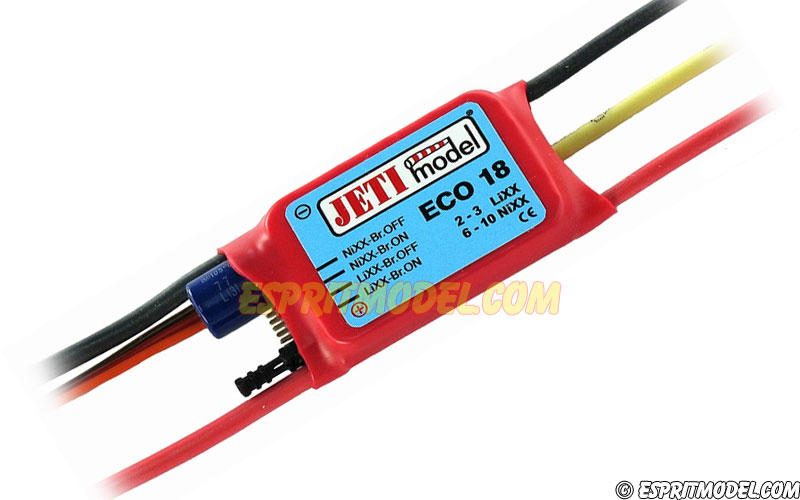
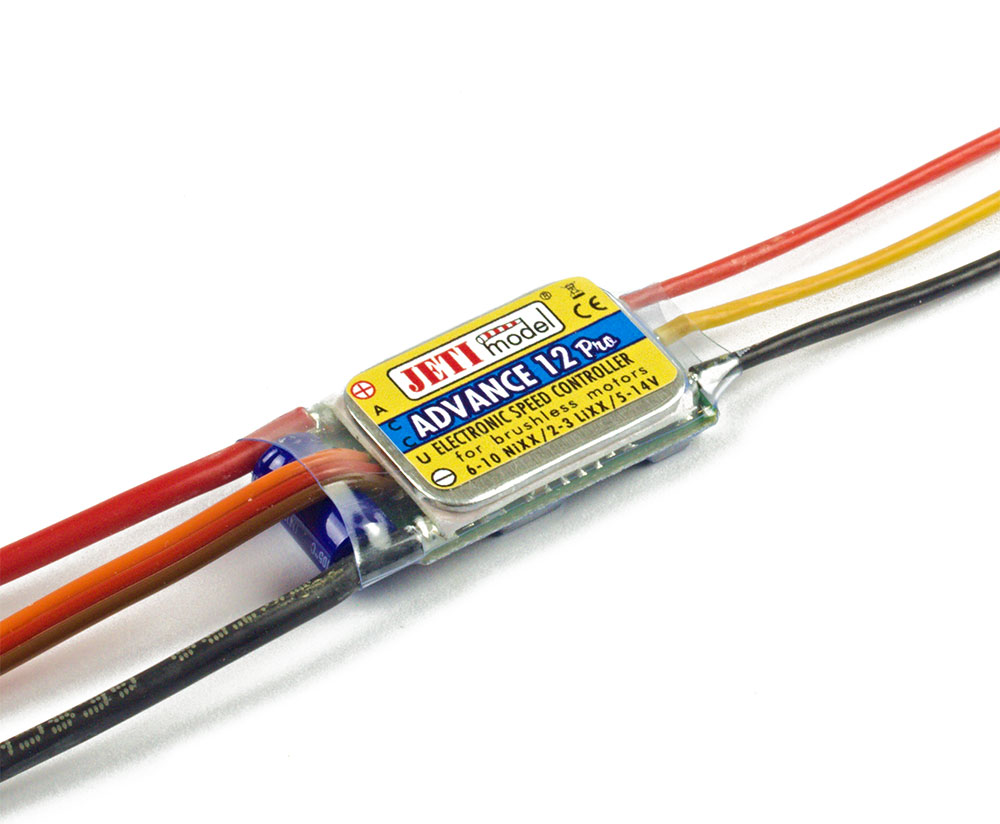
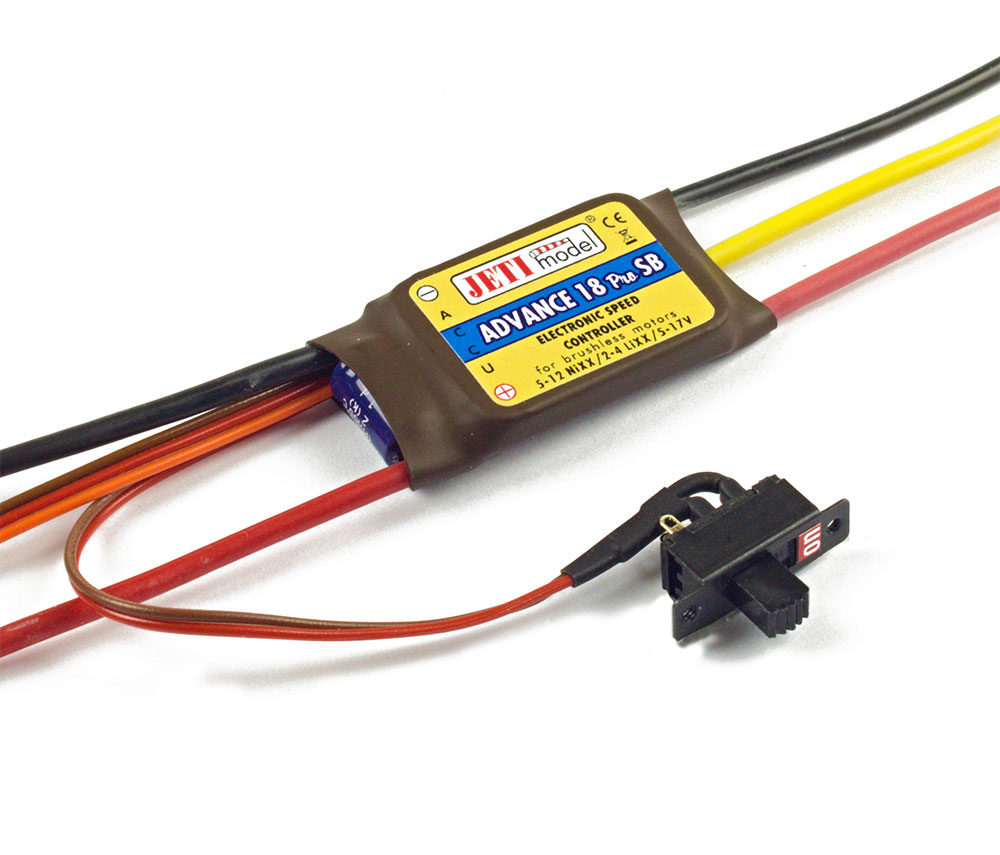
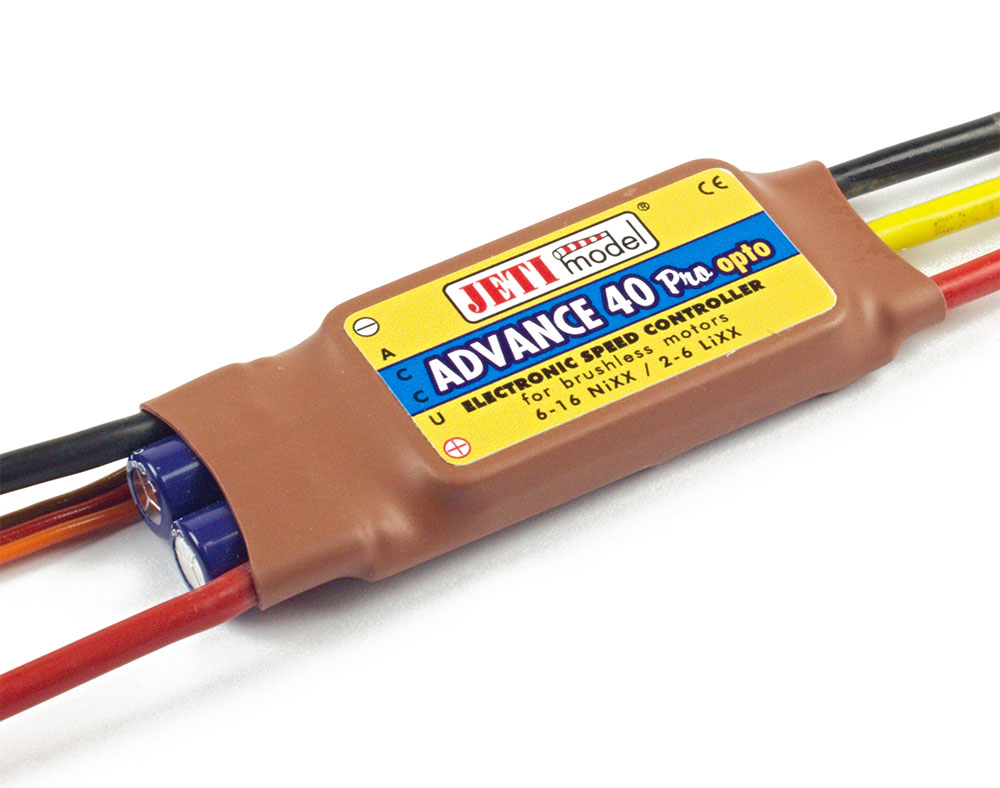
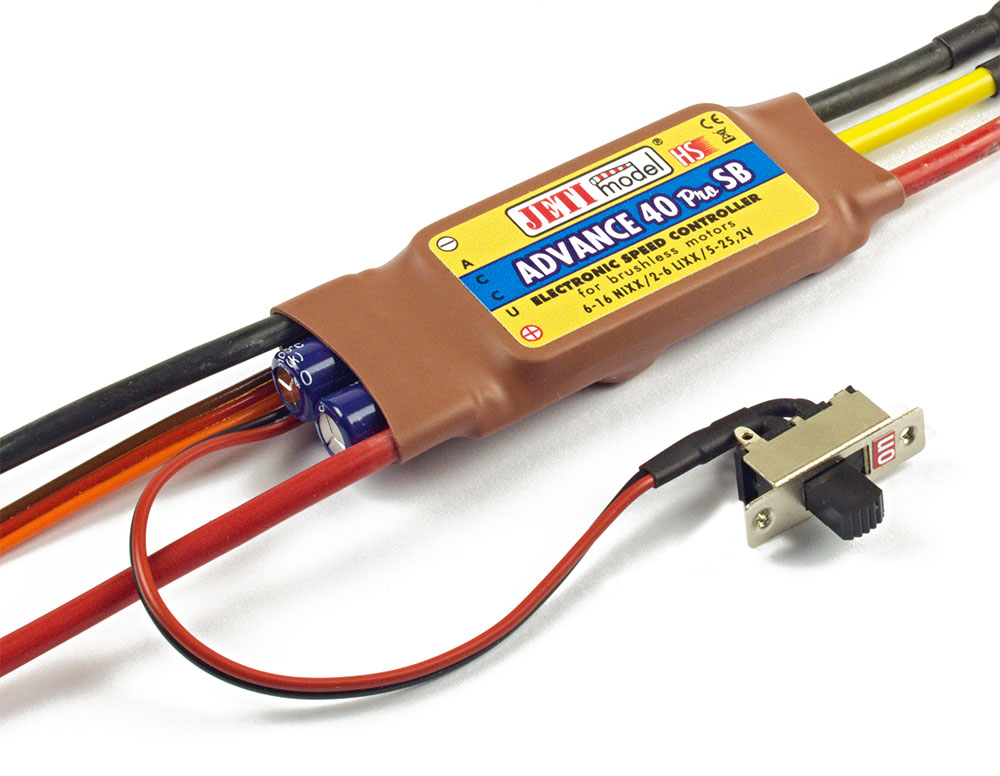
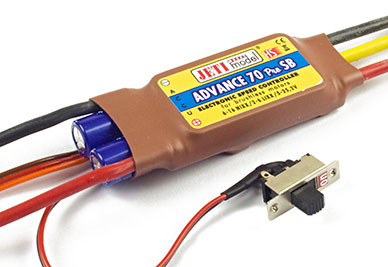
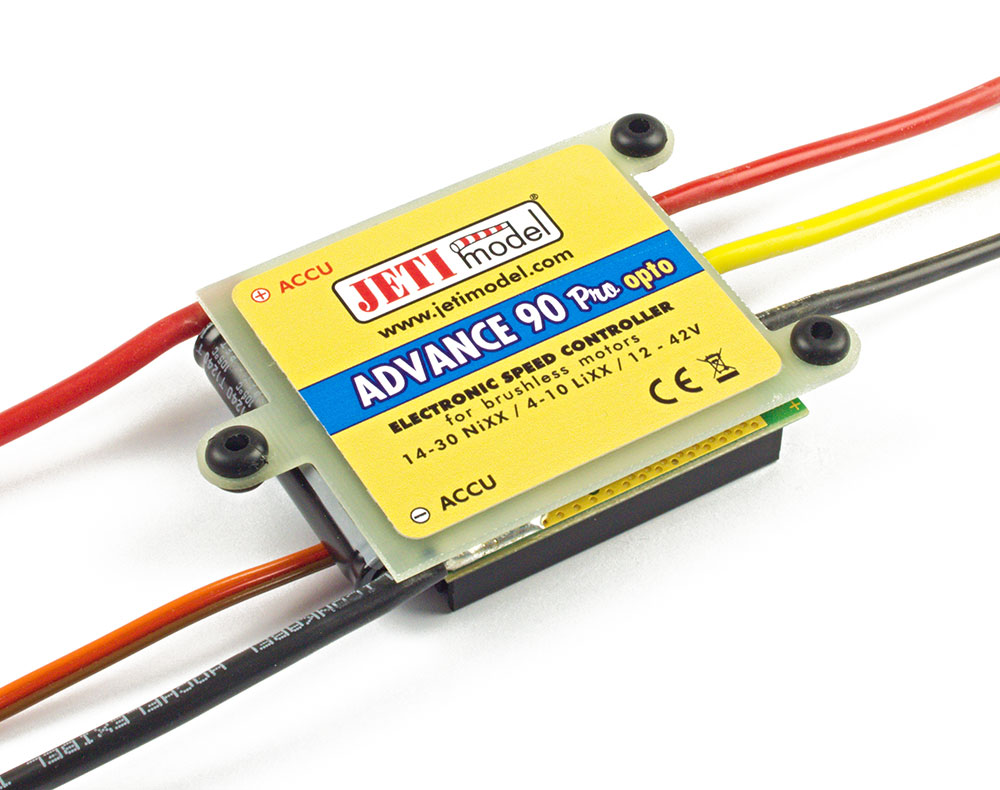
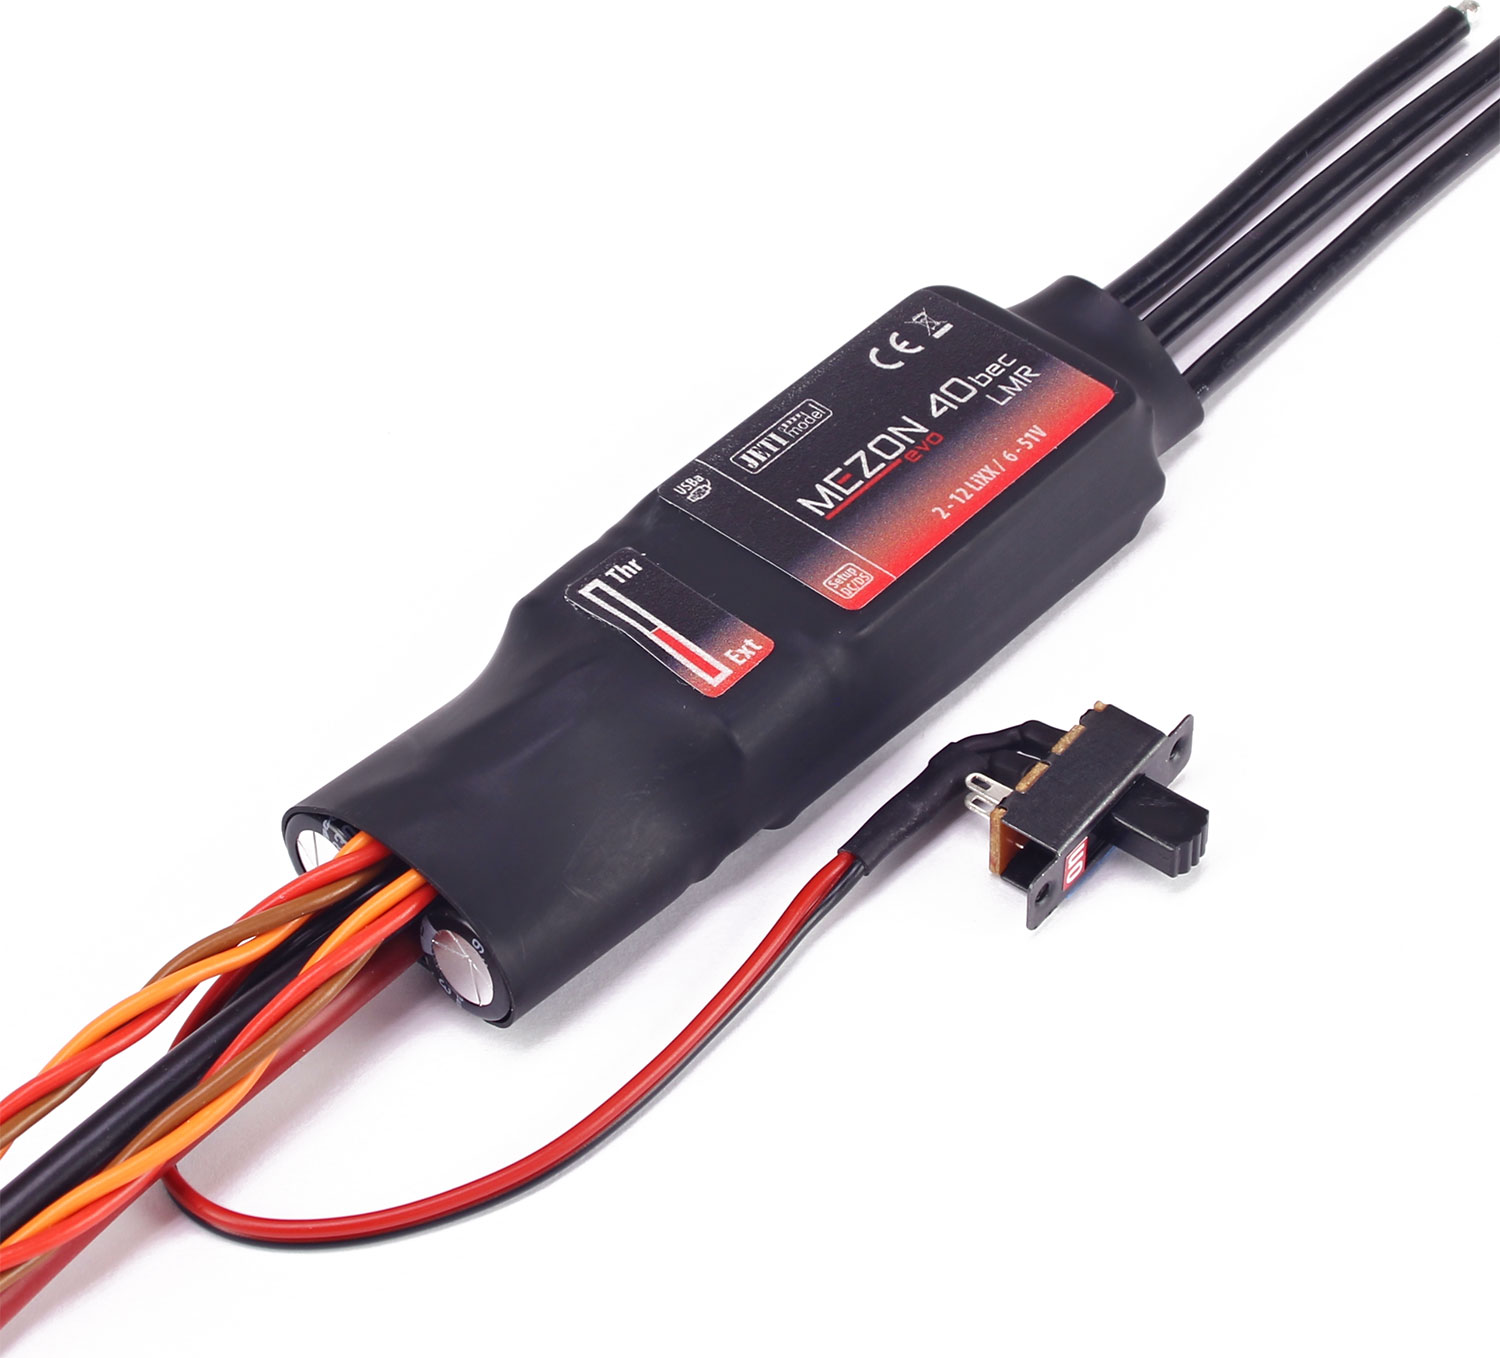
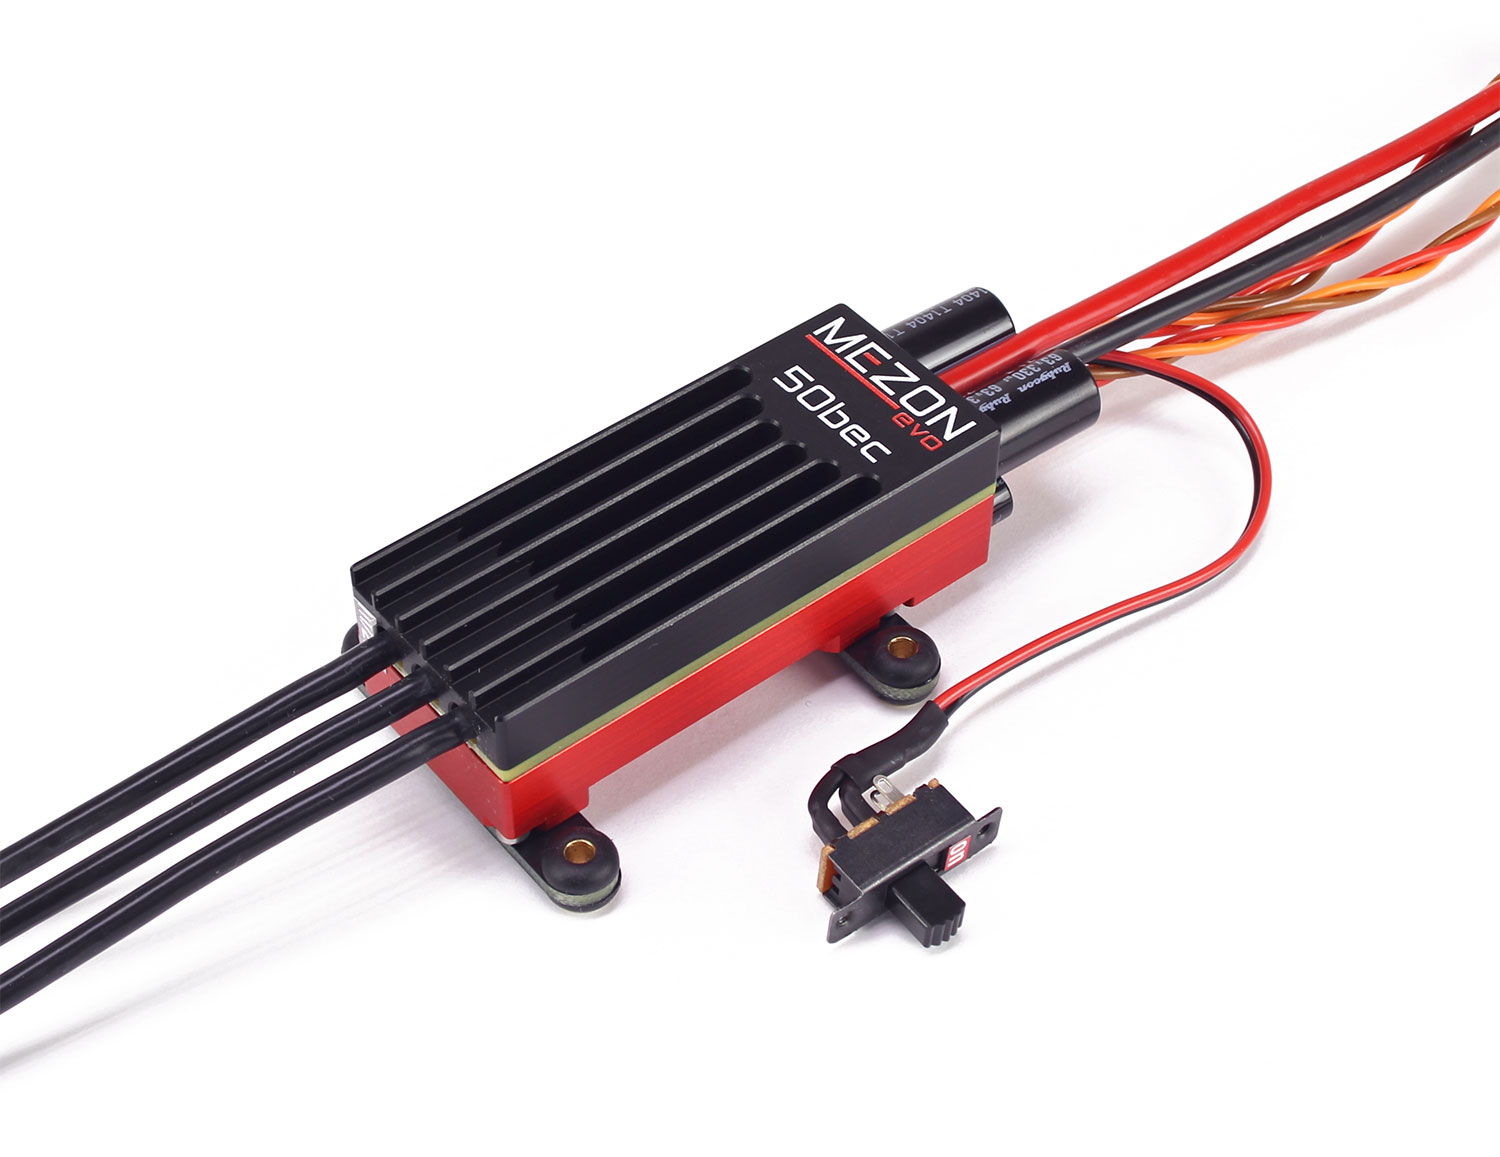
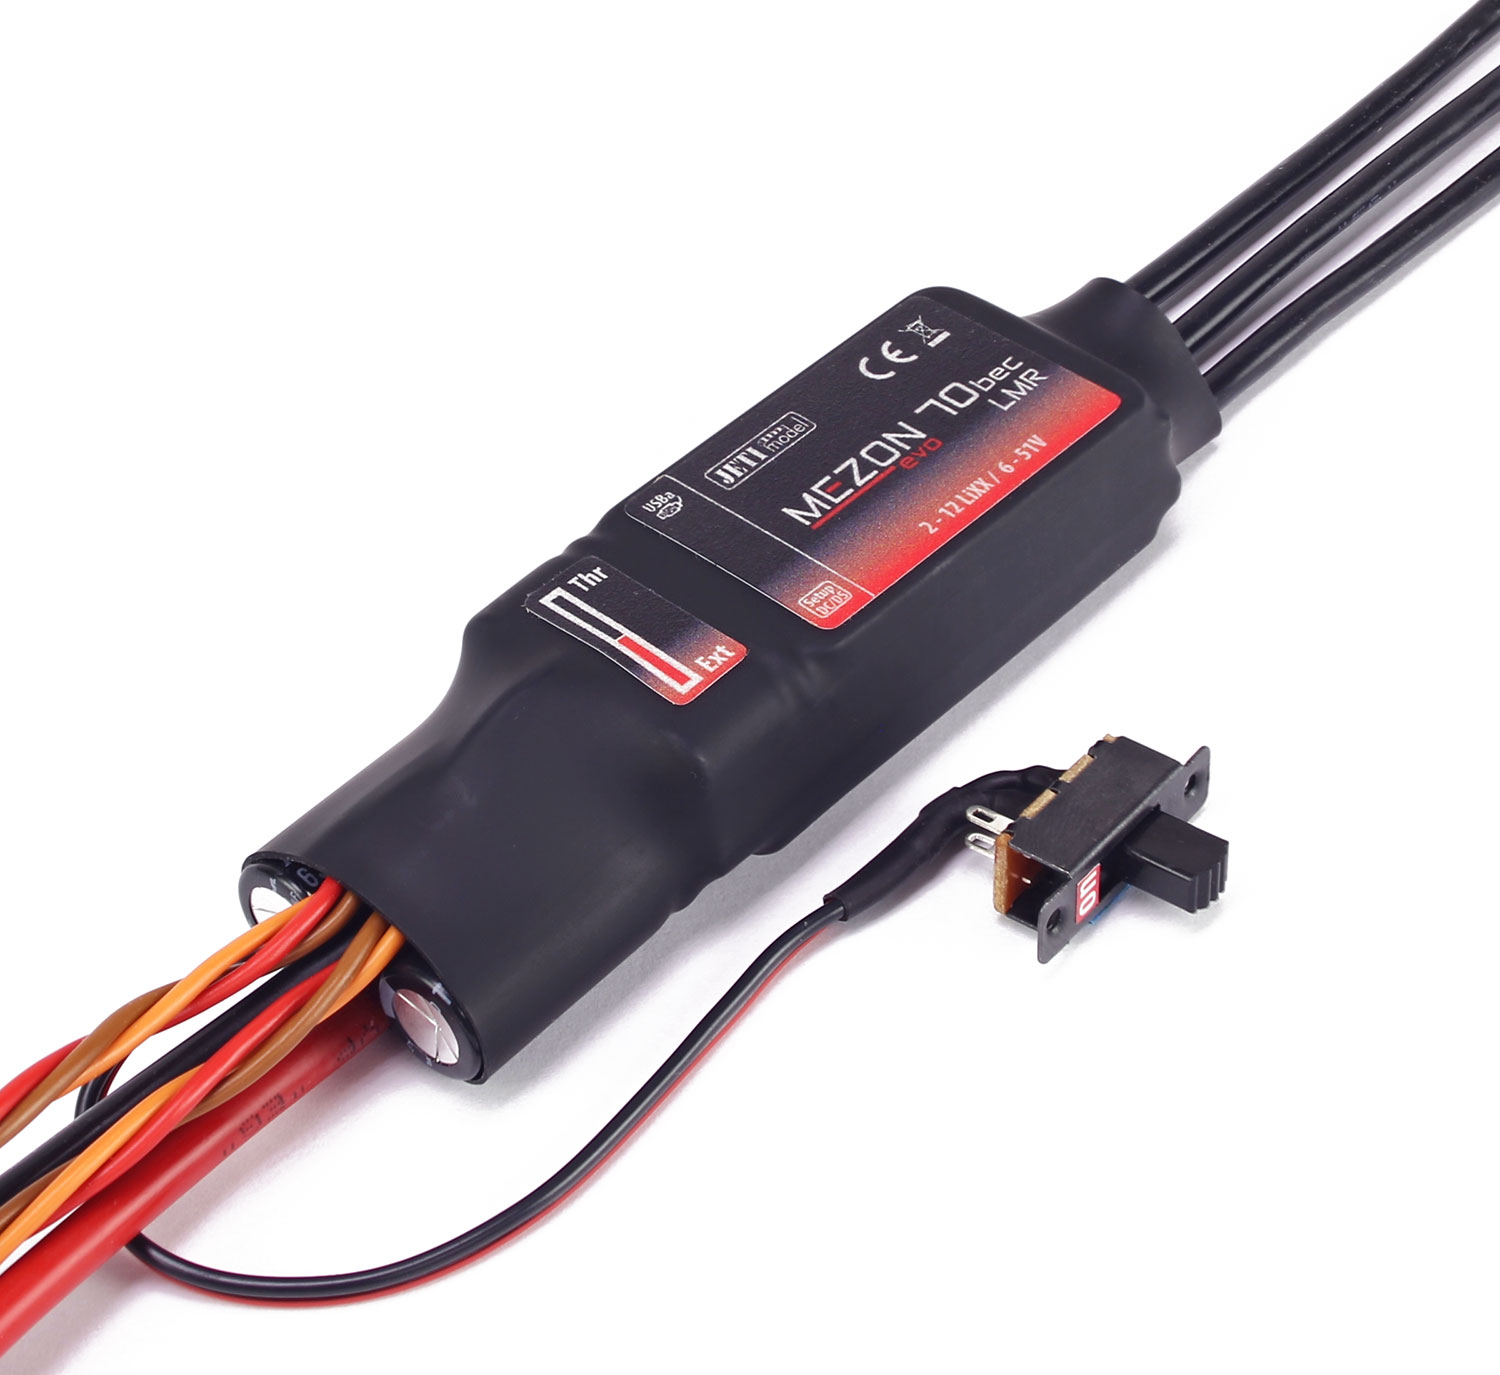
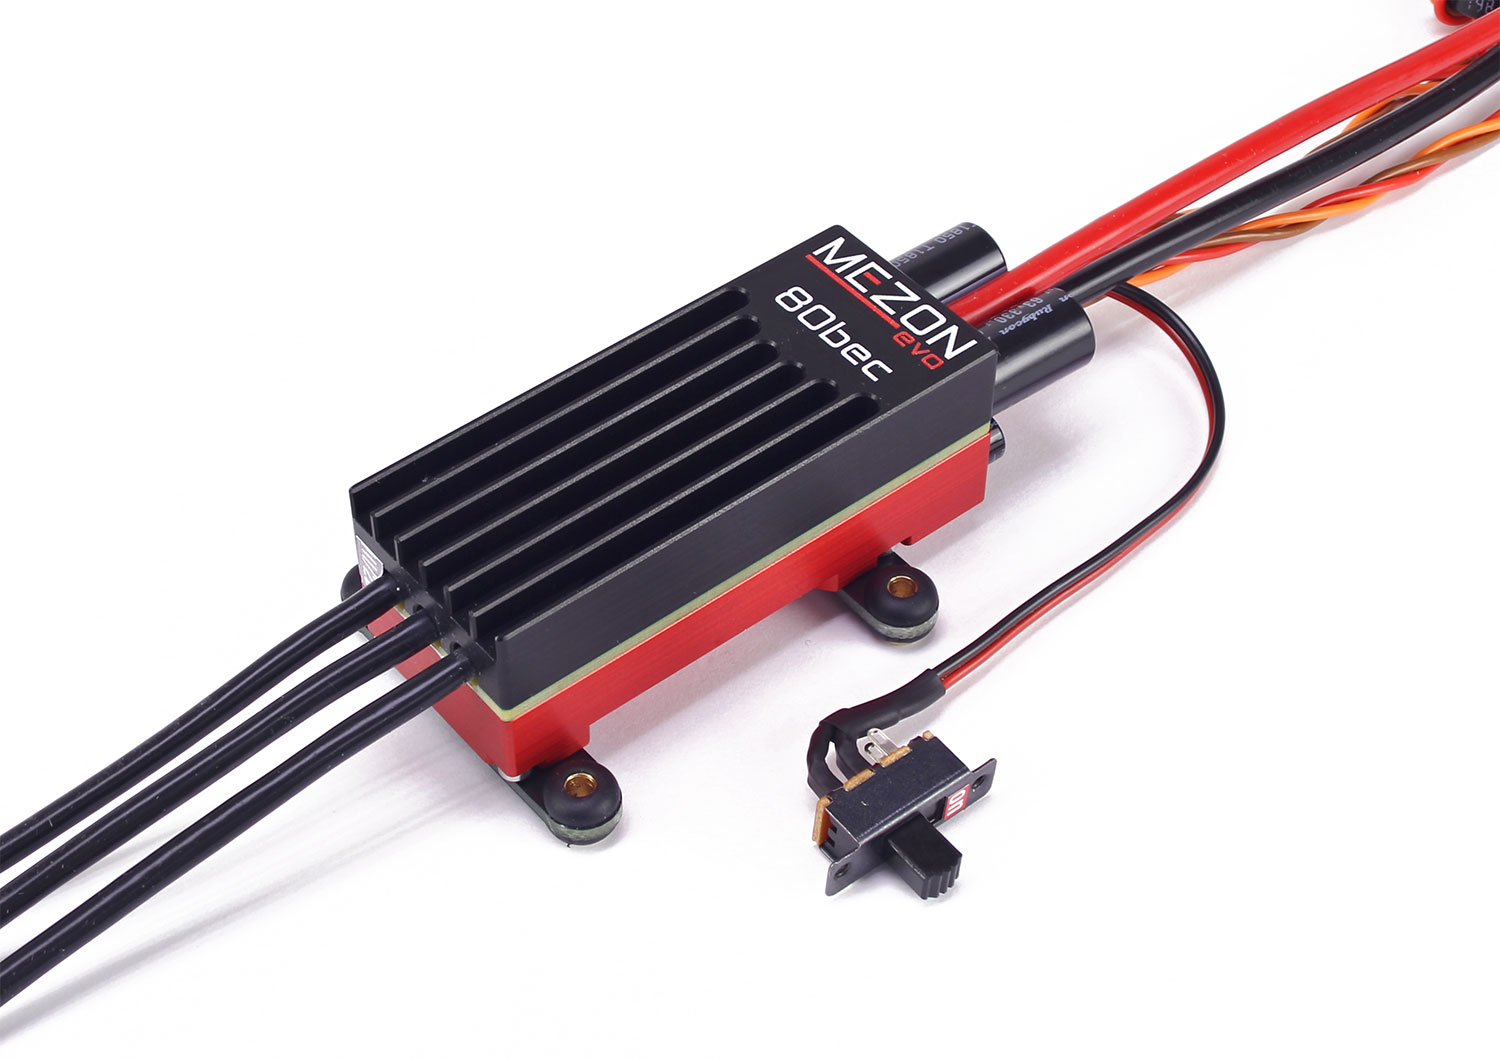
When it comes to electronic speed controls, Jeti has a wide array of options available. Read on to see what each line has to offer.
The ECO line delivers BIG Jeti quality to your small electric park-flyer or electric sailplane applications, while staying at an economical price point.


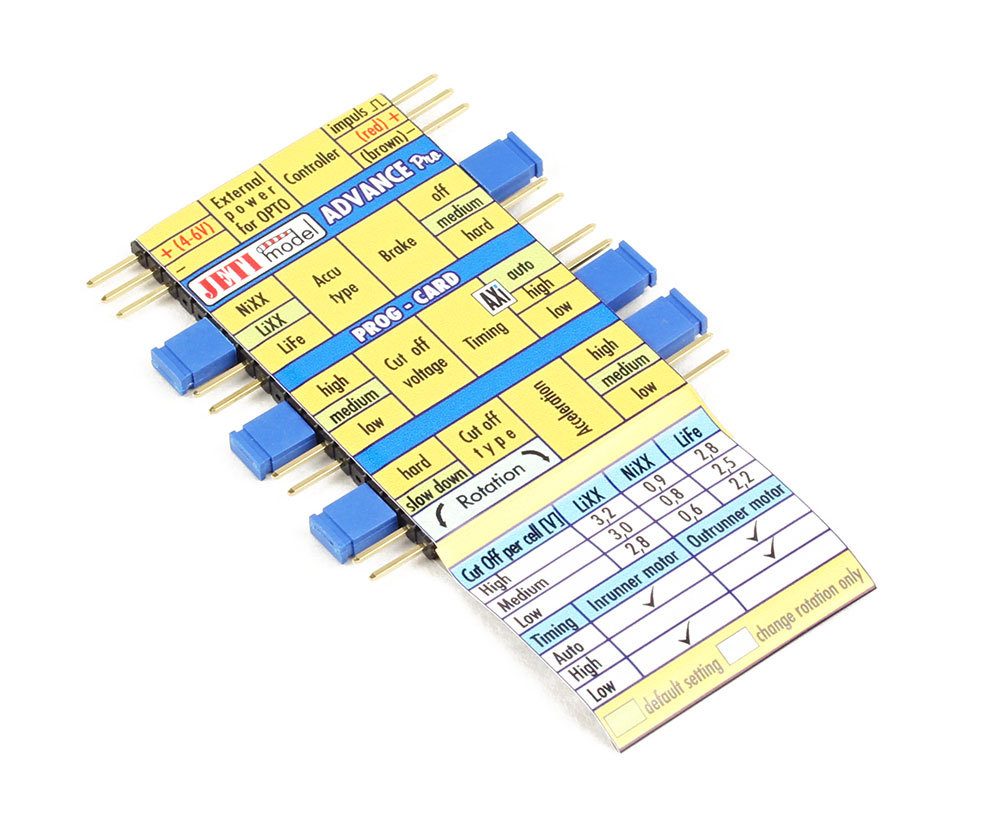
The Advance Pro ESC line is both easy to use and full of features, making it a great choice for any novice pilot or a pilot looking for something simple.
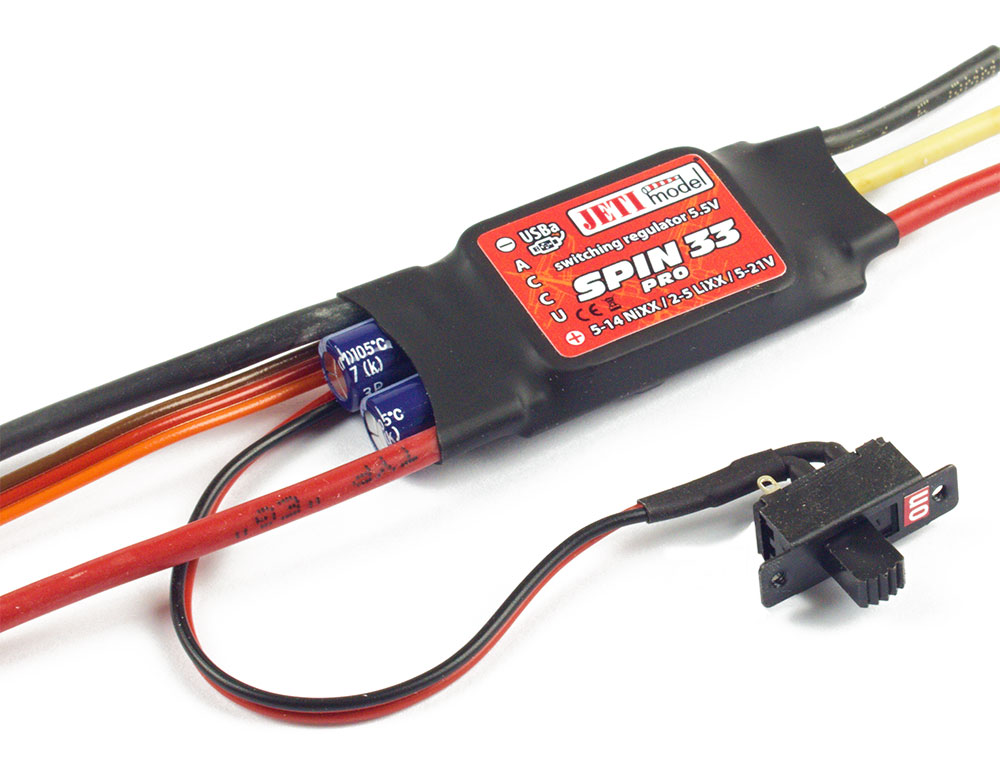
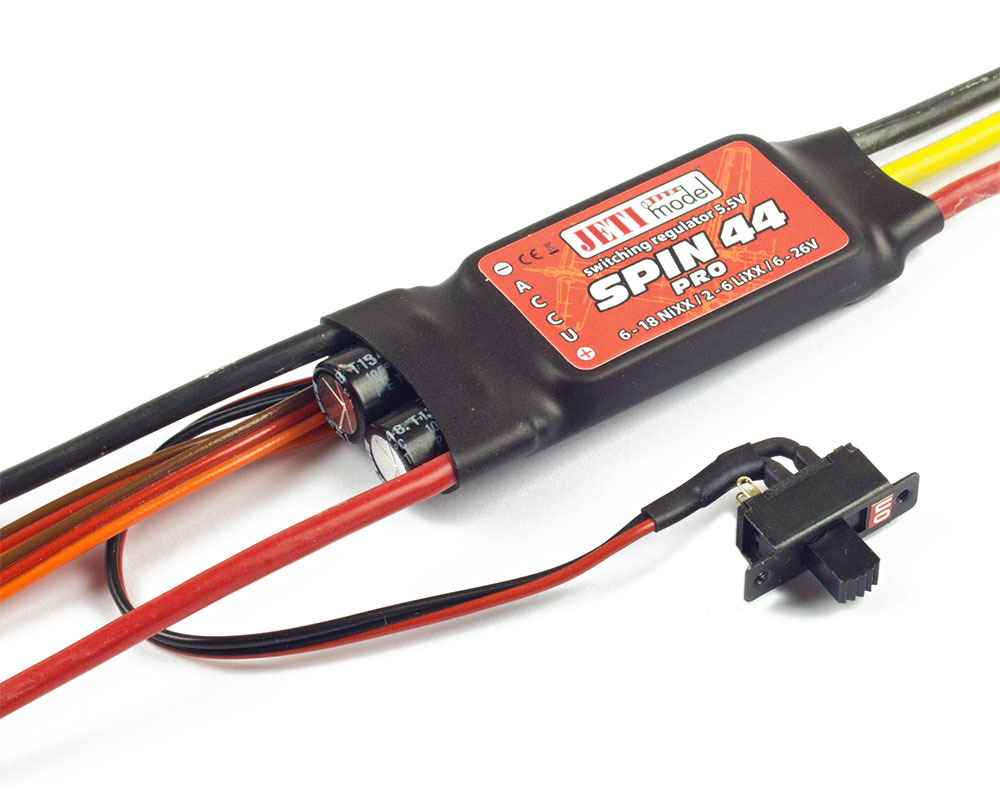
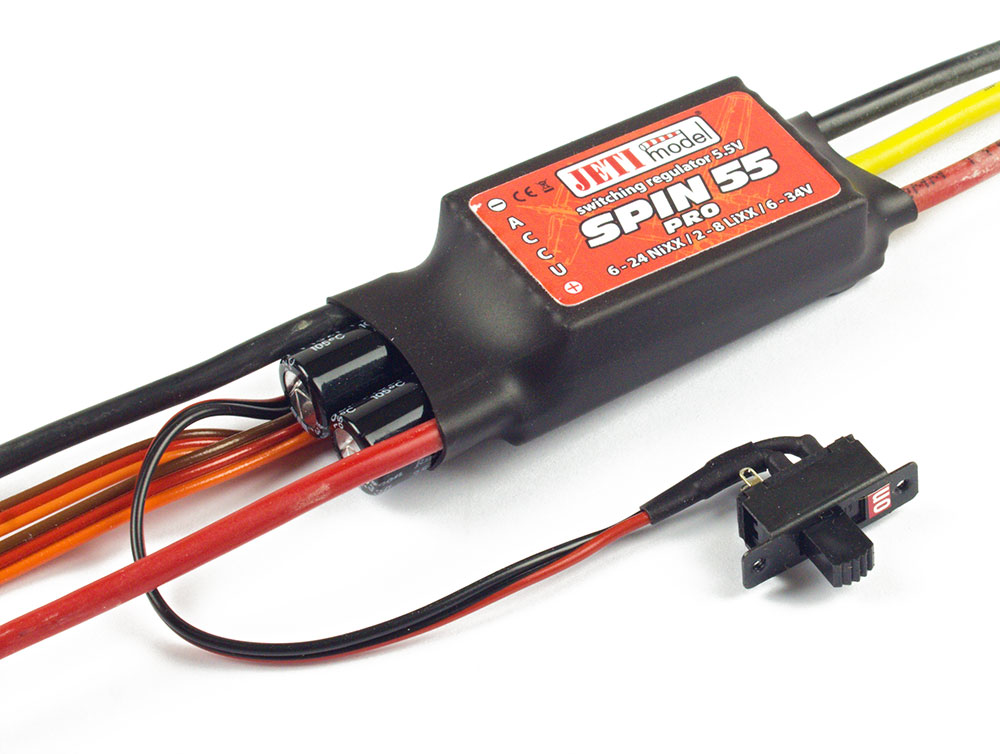
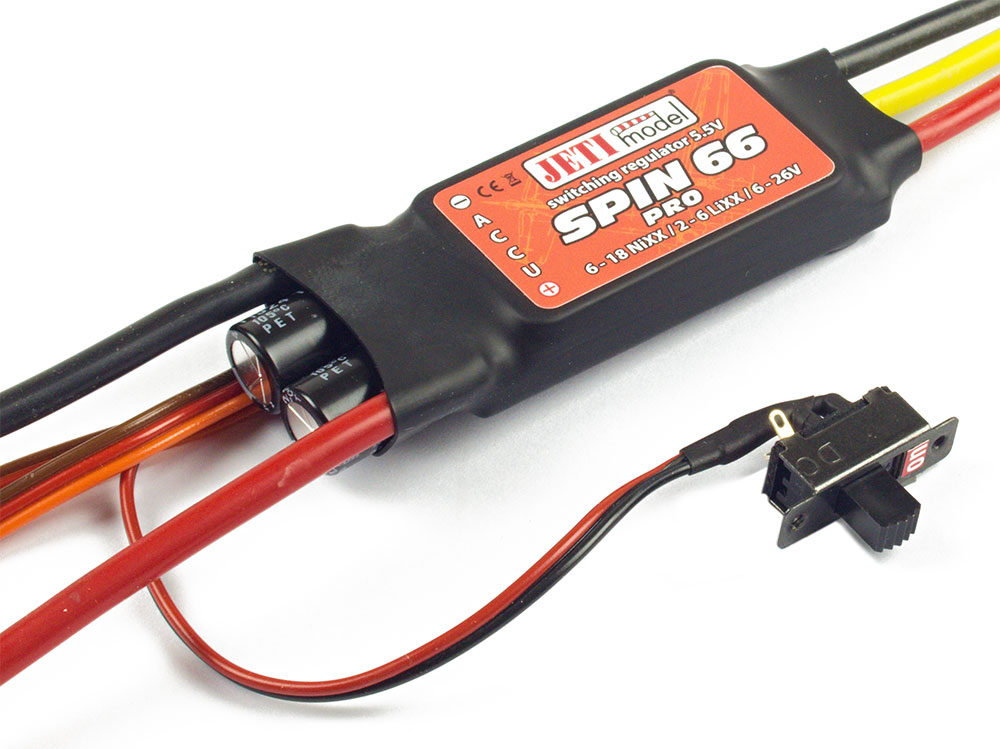
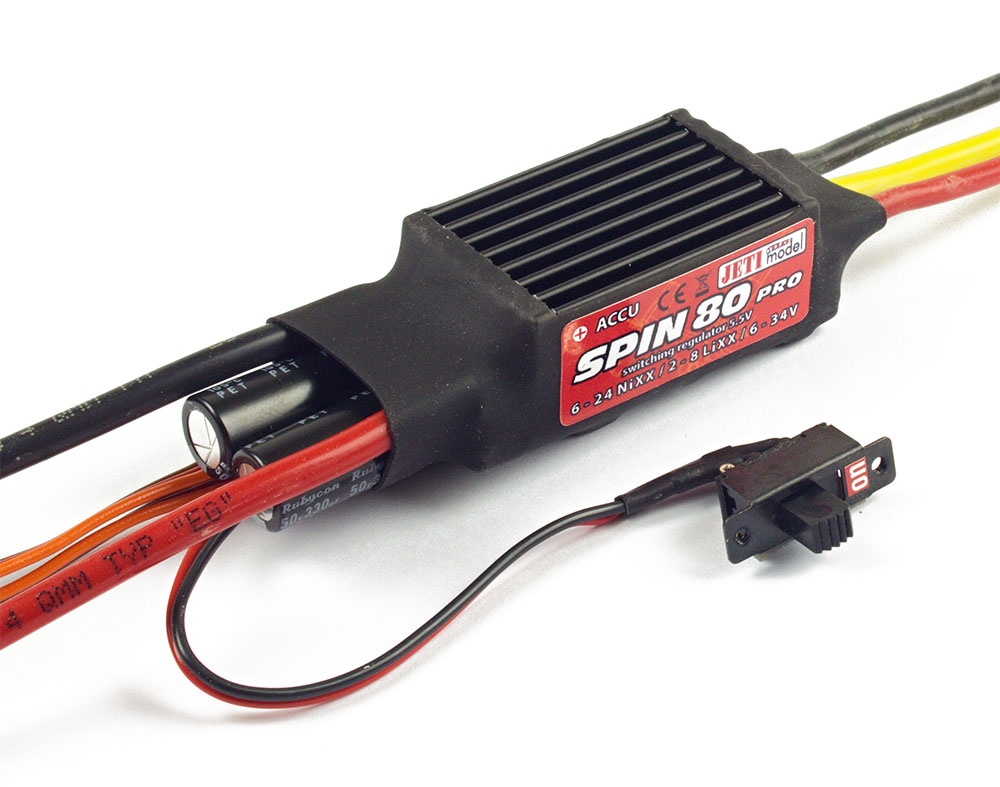
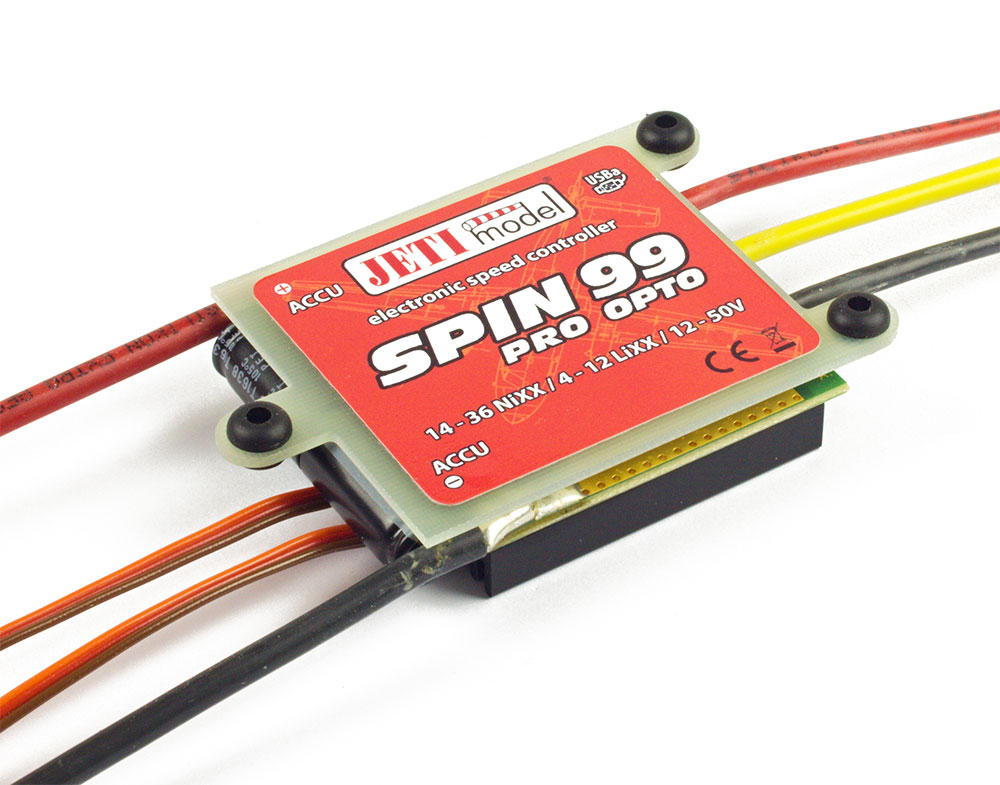
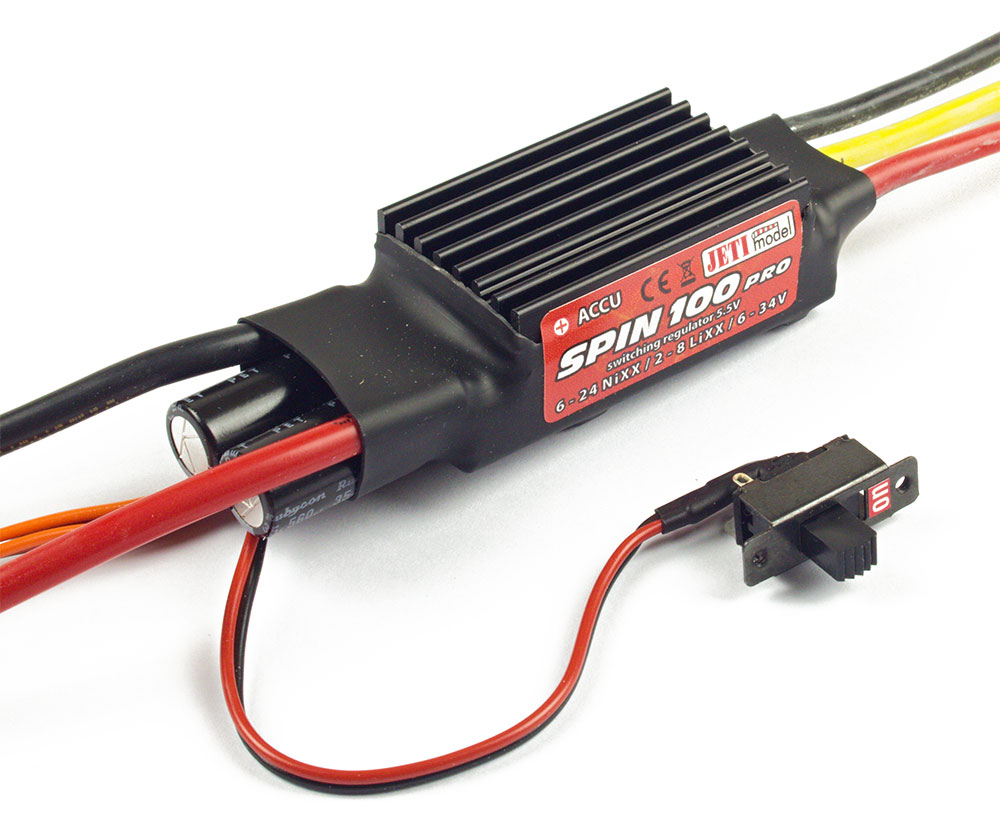
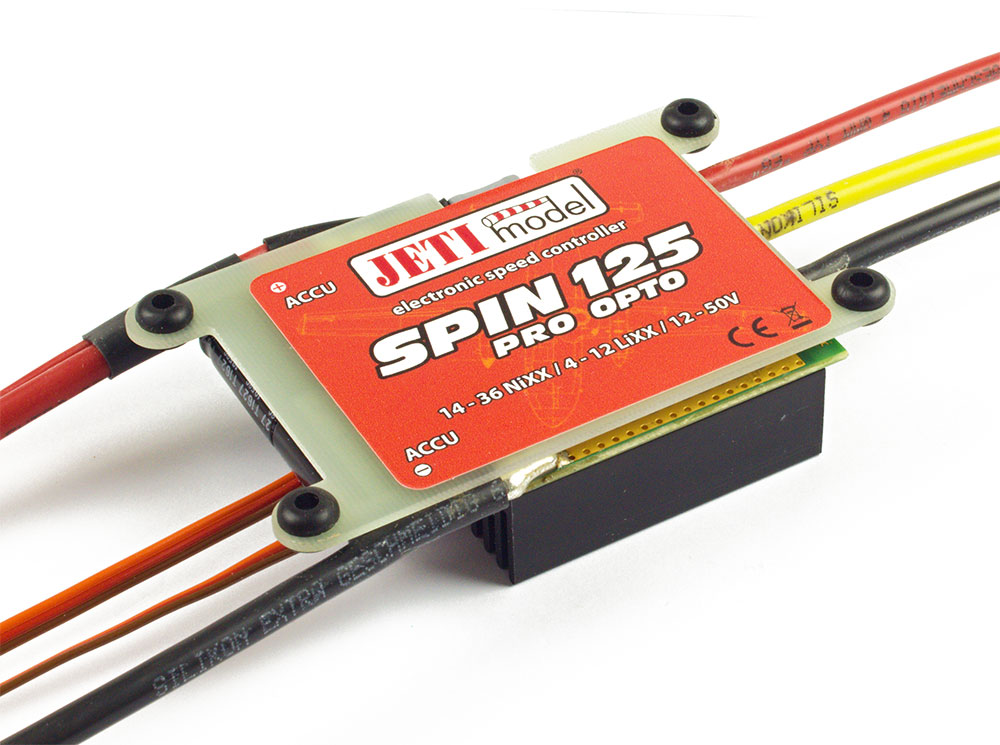
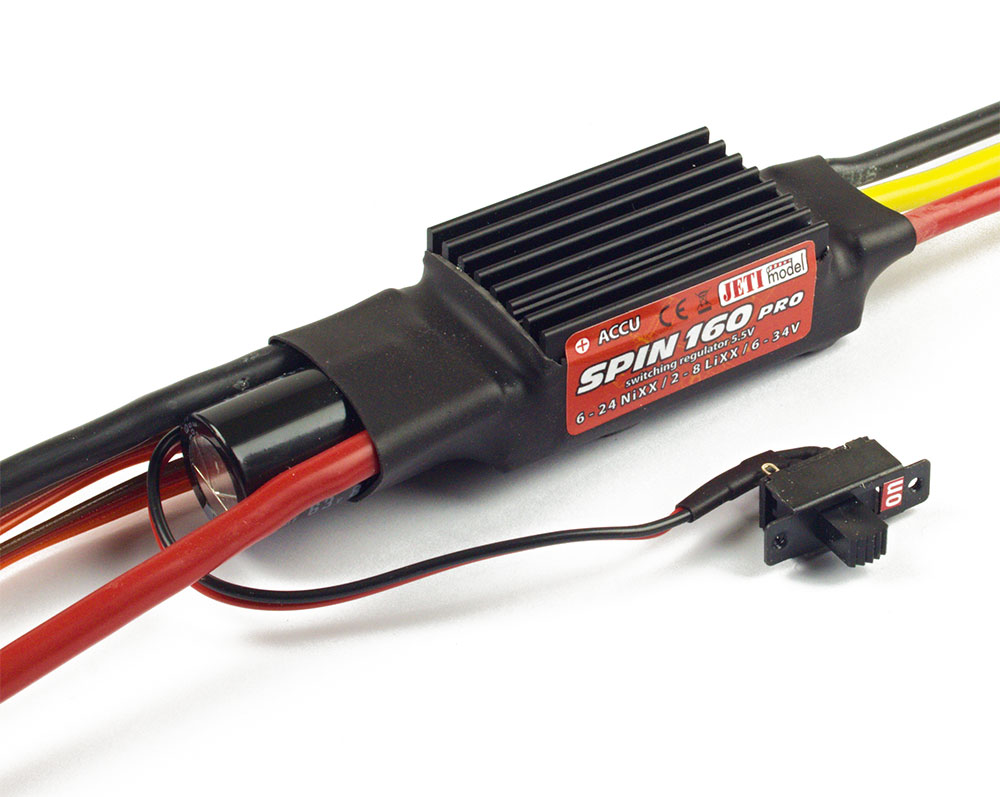
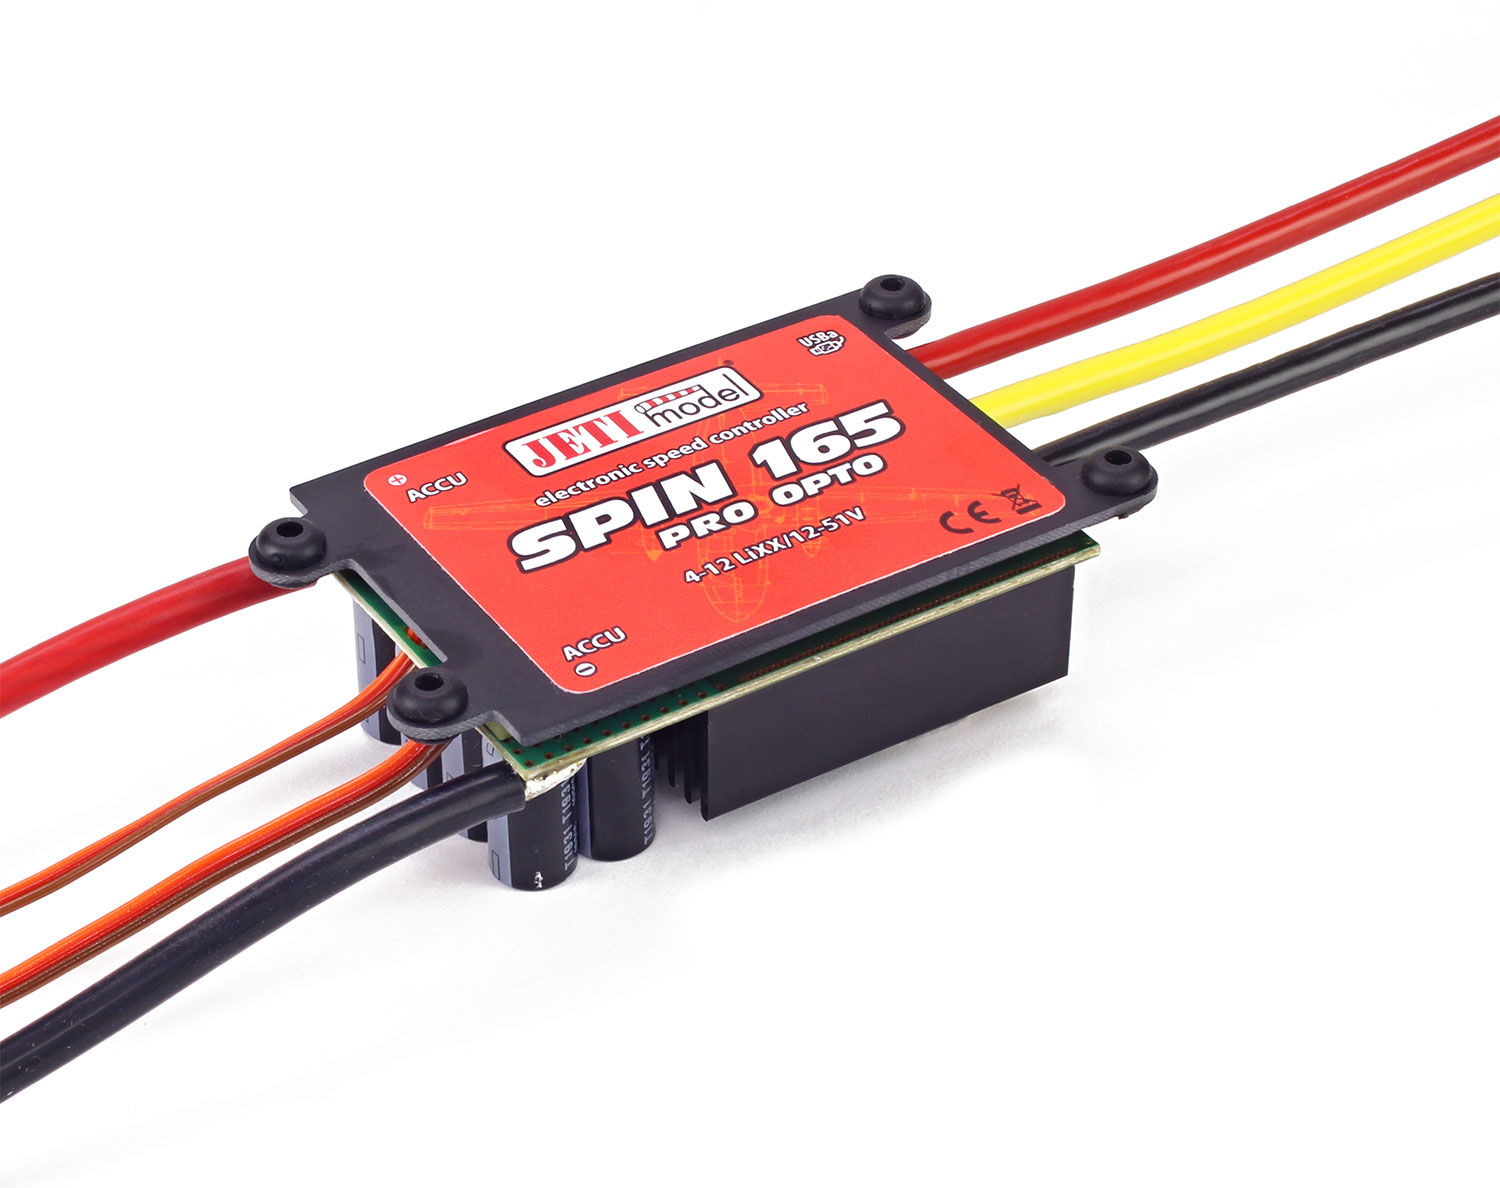
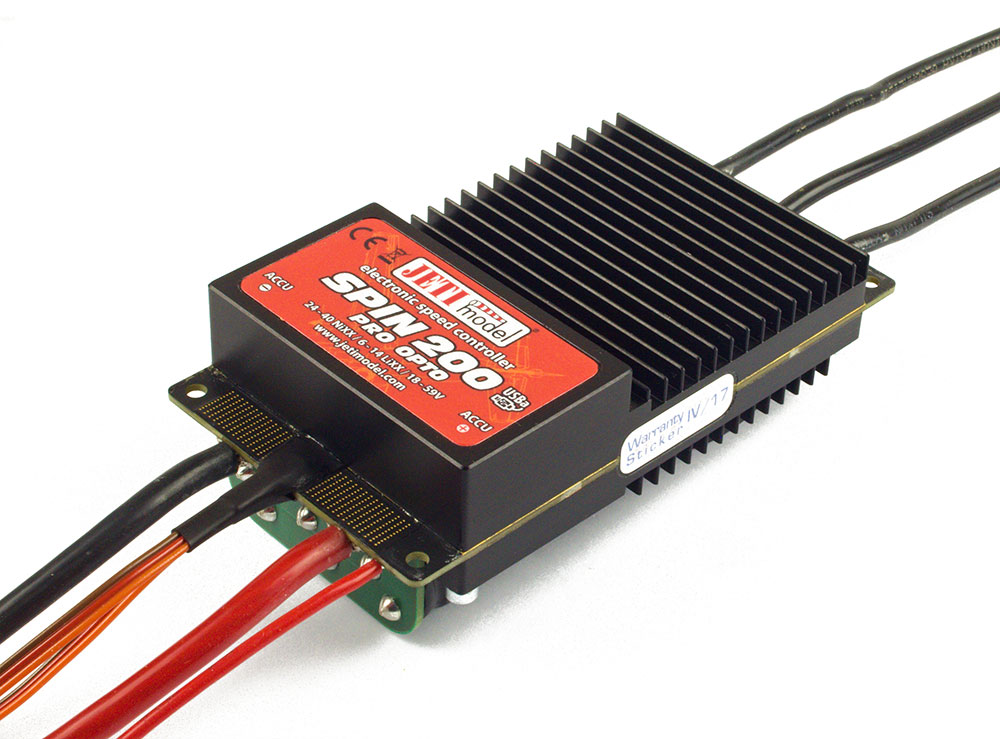
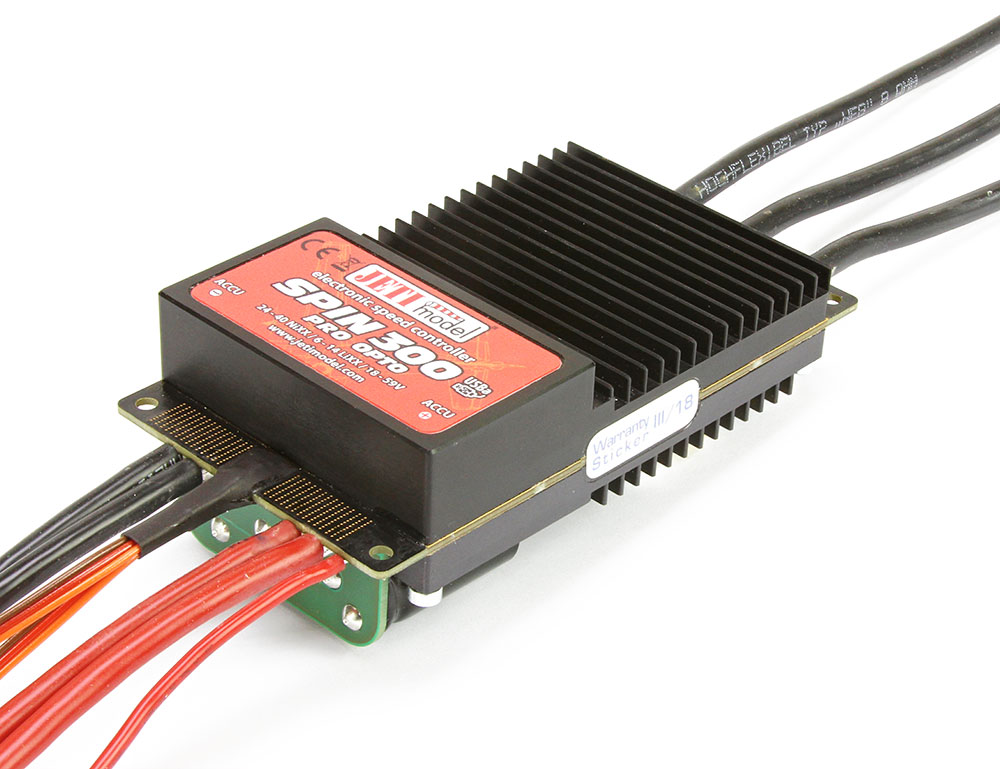
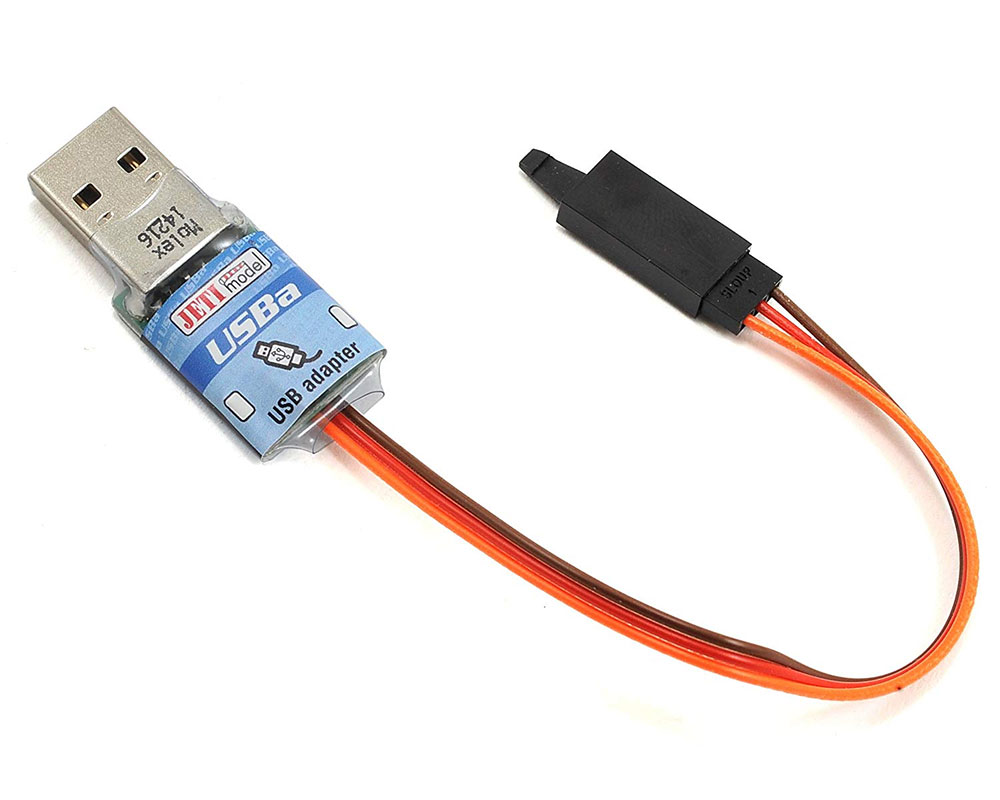
Next in Jeti’s line of ESCs are the Spin Pro Series. These guys take it one step above basic with the introduction of basic logged telemetry data. In addition, it allows for firmware updates via a Jeti USB Adapter and your PC with Jeti Studio.

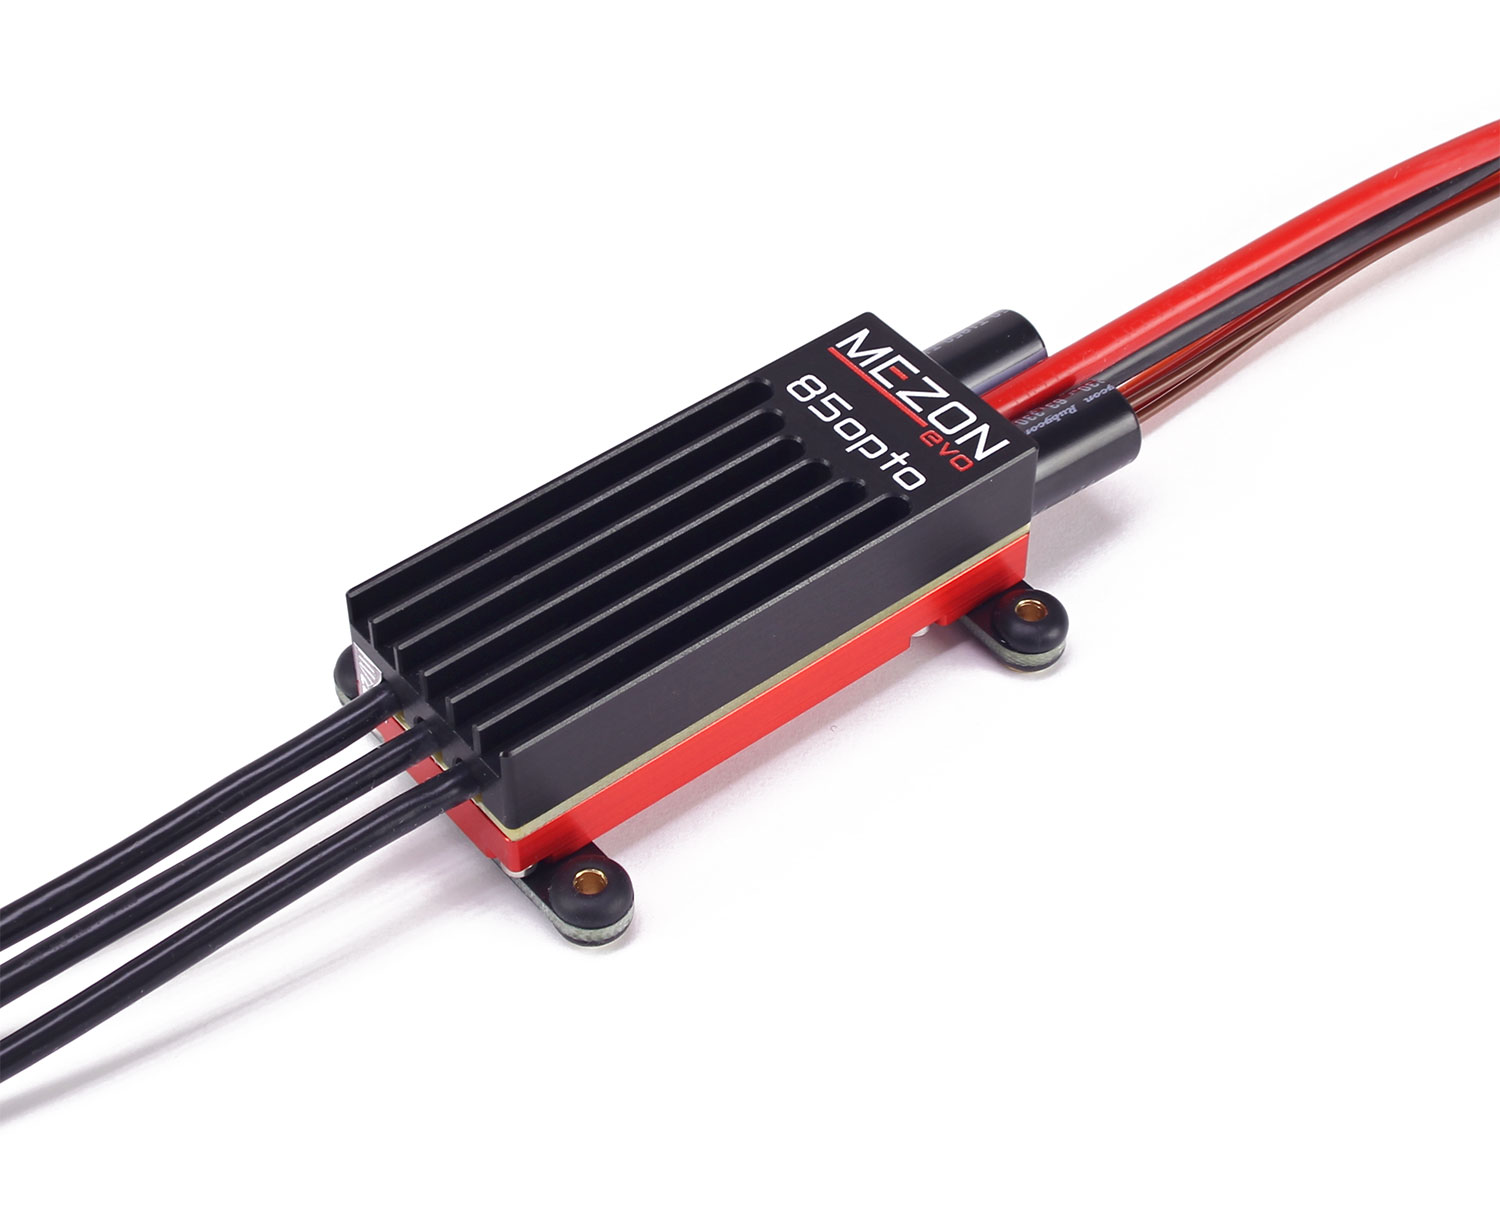
Introducing the next level of integration with the Jeti Mezon Pro ESCs. With these guys, you can get real-time telemetry feedback directly on your Jeti Transmitter!
Inline BEC, MAX BEC, MAX BEC 2D, SBEC, this list goes on – but what does it all mean?
BEC stands for Battery Eliminator Circuit and functions as a voltage regulator. It will take a high voltage and drop it down to a smaller voltage based on needs. These guys come in handy when deciding to use your flight packs (high voltage) to power your receiver, servos, or other low voltage items.
Jeti offers linear BECs and Switching BECS. A linear BEC is a simple device that steps down power and releases the “extra” current in the form of heat. These typically handle small voltages, as too high of a voltage can result in damage to itself and surrounding electronics. A switching BEC will drop voltage through a process that will alternate the current (turning on an off quickly) so that only the necessary current will be used. This reduces power waste (through heat) for more efficiency. In addition, Switching BECs can often handle higher input voltages.
So what does Jeti have? Let’s take a look!
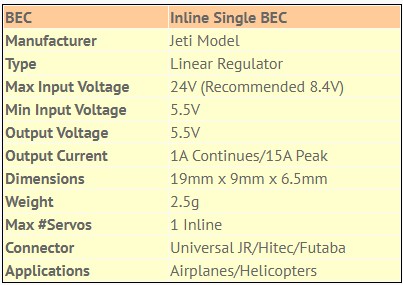
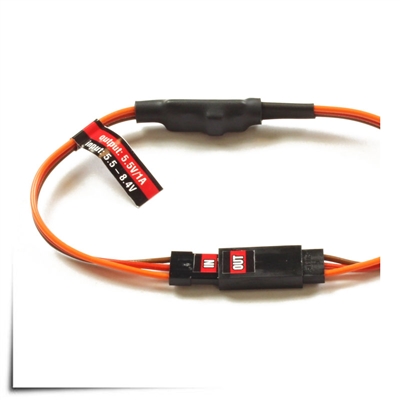
Inline Single BEC
This is a linear voltage regulator. The Jeti Inline Single BEC is designed to regulate the voltage from your 5.5-8.4V power source and provide an output voltage of 5.5V up to 1A for your dedicated servo. Works well with any servo. Read the specs here.
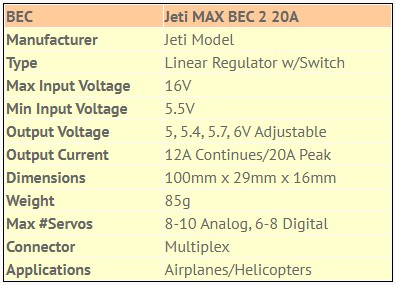
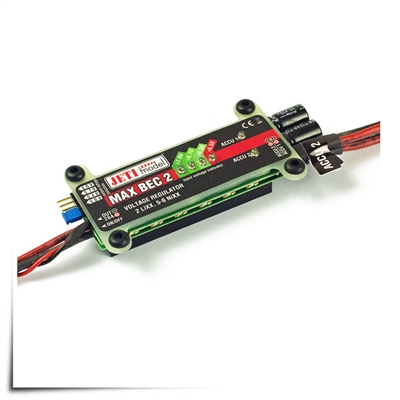
MAX BEC 2
The Jeti Max BEC 2 is another linear voltage regulator offering two power inputs for two 2S LiXX batteries or 6S NiXX, with a maximum output of 20 amps, a sustained output of 12 amps and a weight of 85 grams. The linear voltage regulation provided by this unit does not contribute to radio interference. Read the specs here.
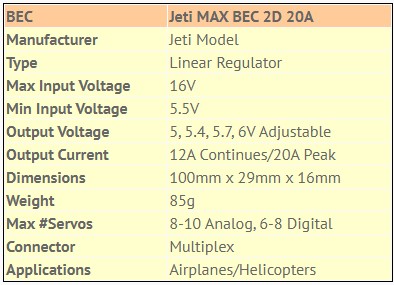
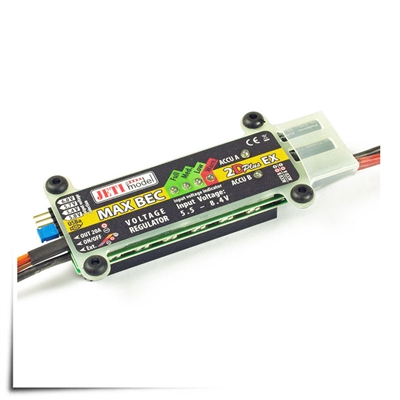
MAX BEC 2D Plus EX
Another great choice in the line of linear voltage regulators is the MAX BEC 2D plus EX. The Max BEC 2D Plus features a magnetic switch, so there is no mechanical wear-and-tear from switching the unit on and off. The unit also has a large heat-sink to dissipate heat. In addition to its magnetic switch feature, the 2D is programmable (output voltage) using the Jeti Box or jumper pins. This BEC is Duplex 2.4EX compatible, allowing audible alarms to be configured for low input voltage or high-temperature and allowing real-time telemetry feedback of input voltage and temperature. Read the specs here.
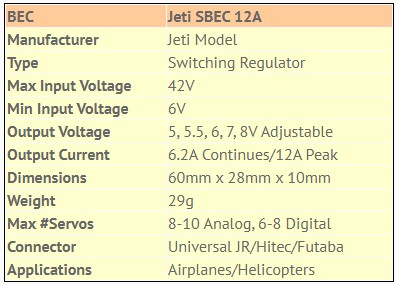
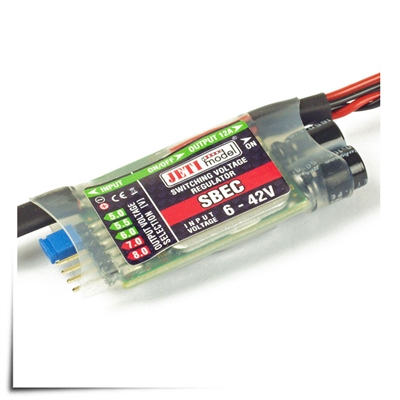
SBEC
Jeti SBEC is a switching BEC designed to regulate the voltage from your 6-42V power source (2-10S LiXX packs) and provide a selectable output voltage of 5 to 8 volts at up to 12 amps. With high output voltages available the Jeti SBEC switching regulator is ready for your high-voltage servos and will satisfy the requirements of most modelers. Read the specs here.
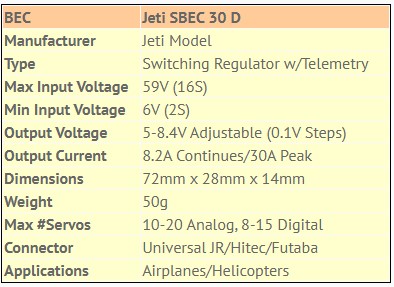
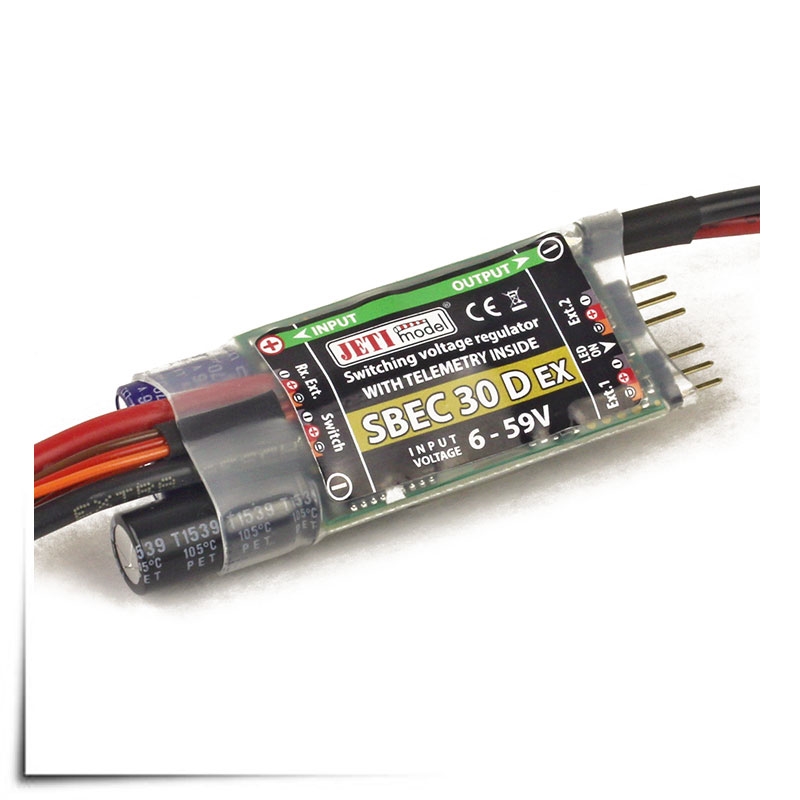
SBEC 30 D EX
Jeti SBEC 30 D EX provided full telemetry feedback, and is completely programable through Device Explorer on your transmitter. Due to its flexibility, the SBEC 30 allows connection of up to two additional sensors. SBEC 30 then acts as an expander and sends its own telemetry to the receiver together with the telemetry of connected sensors. Another cool feature is that the SBEC 30 D EX can be configured as a sensor of logic levels (log. 0 or log. 1). Watch the video to learn how! The SBEC 30 comes with universal 4-port magnetic switch. Read the specs here.
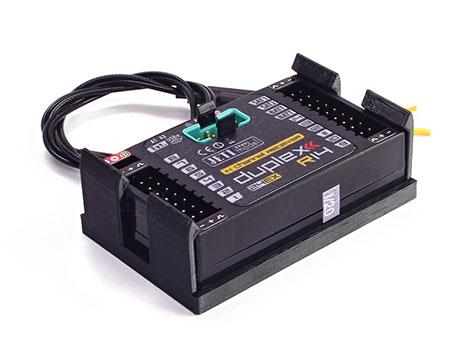
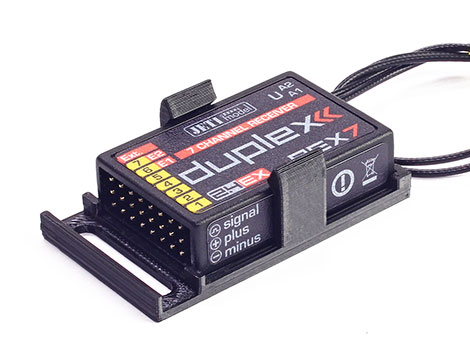
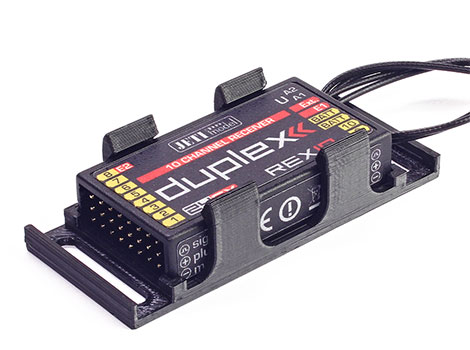
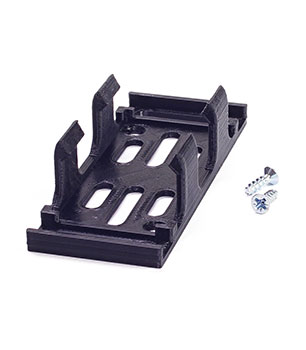
Check out these gems! 3D printed Jeti Rx holders! With five different models, there is one that will fit your Jeti Receiver. Type 9 will even fit your Jeti Central Box 100!
Models include: Type 3 (R3/RSW/900 REX), Type 9 (R7/R9/R11/Central Box 100), Type 14 (R14/R18), Type REX 7 (R7/R7 REX Assist), Type REX 10 (R10/R12 REX Assist).
Check them out here.
We are excited to announce a brand new product to our line of switches. The Microswitch 15 is a new switch designed for switching on or off your model. Small, and capable of high current endurance , this little guy is great for applications where space and weight are concerns!

Over the years there have been many Power Distribution Systems added (and removed) to our product line. There is no question that it can get confusing. In this blog, we are going to take a look at what a power distribution system is, and why we have so many different types.
What is a Power Distribution System?
Jeti’s Power Distribution Systems are known as Central Boxes. Our line of Central boxes provide a way to manage your aircrafts servos as well as offer additional safety features such as overload protection, telemetry, and signal redundancy abilities. They are offered in four different sizes, all with their own specific uses. Each and every Central Box is wirelessly programable through the Jeti Transmitters, and supports future updates via the USBa cable and Jeti Studio.
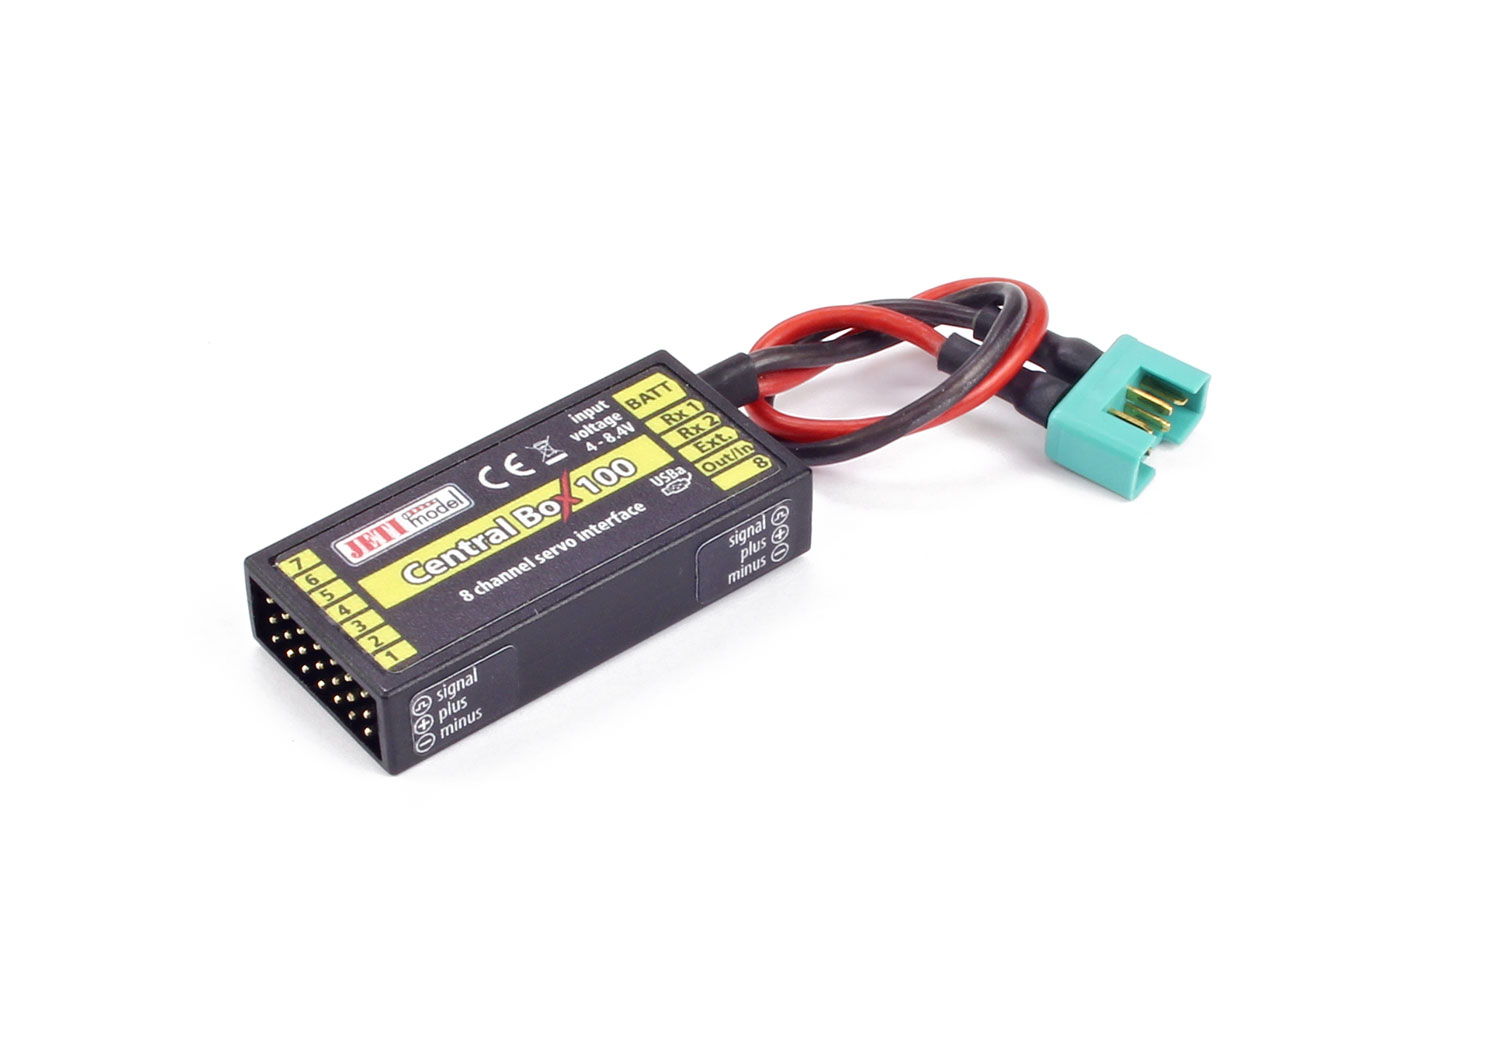
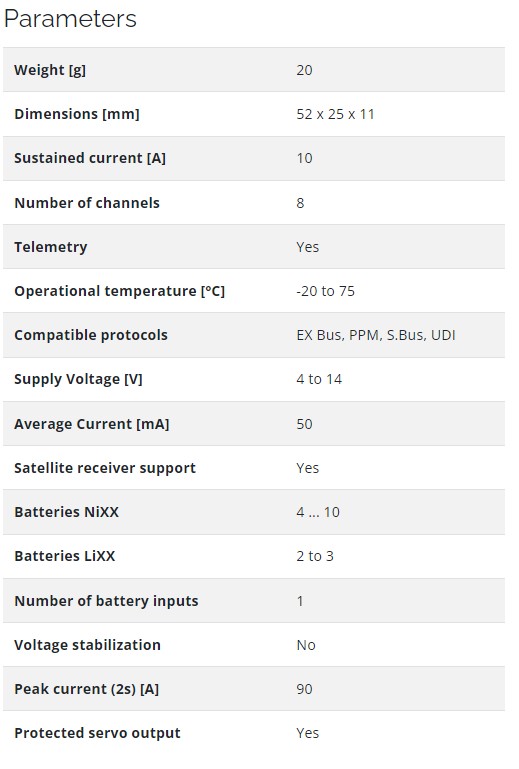
The Central Box 100 is the smallest of the Central Boxes. It can manage up to eight servos, three telemetry inputs and two receivers. It has one battery connection (multiplex). Although the smallest, the CB100 still offers overload protection on each servo output, telemetry, and signal redundancy abilities.
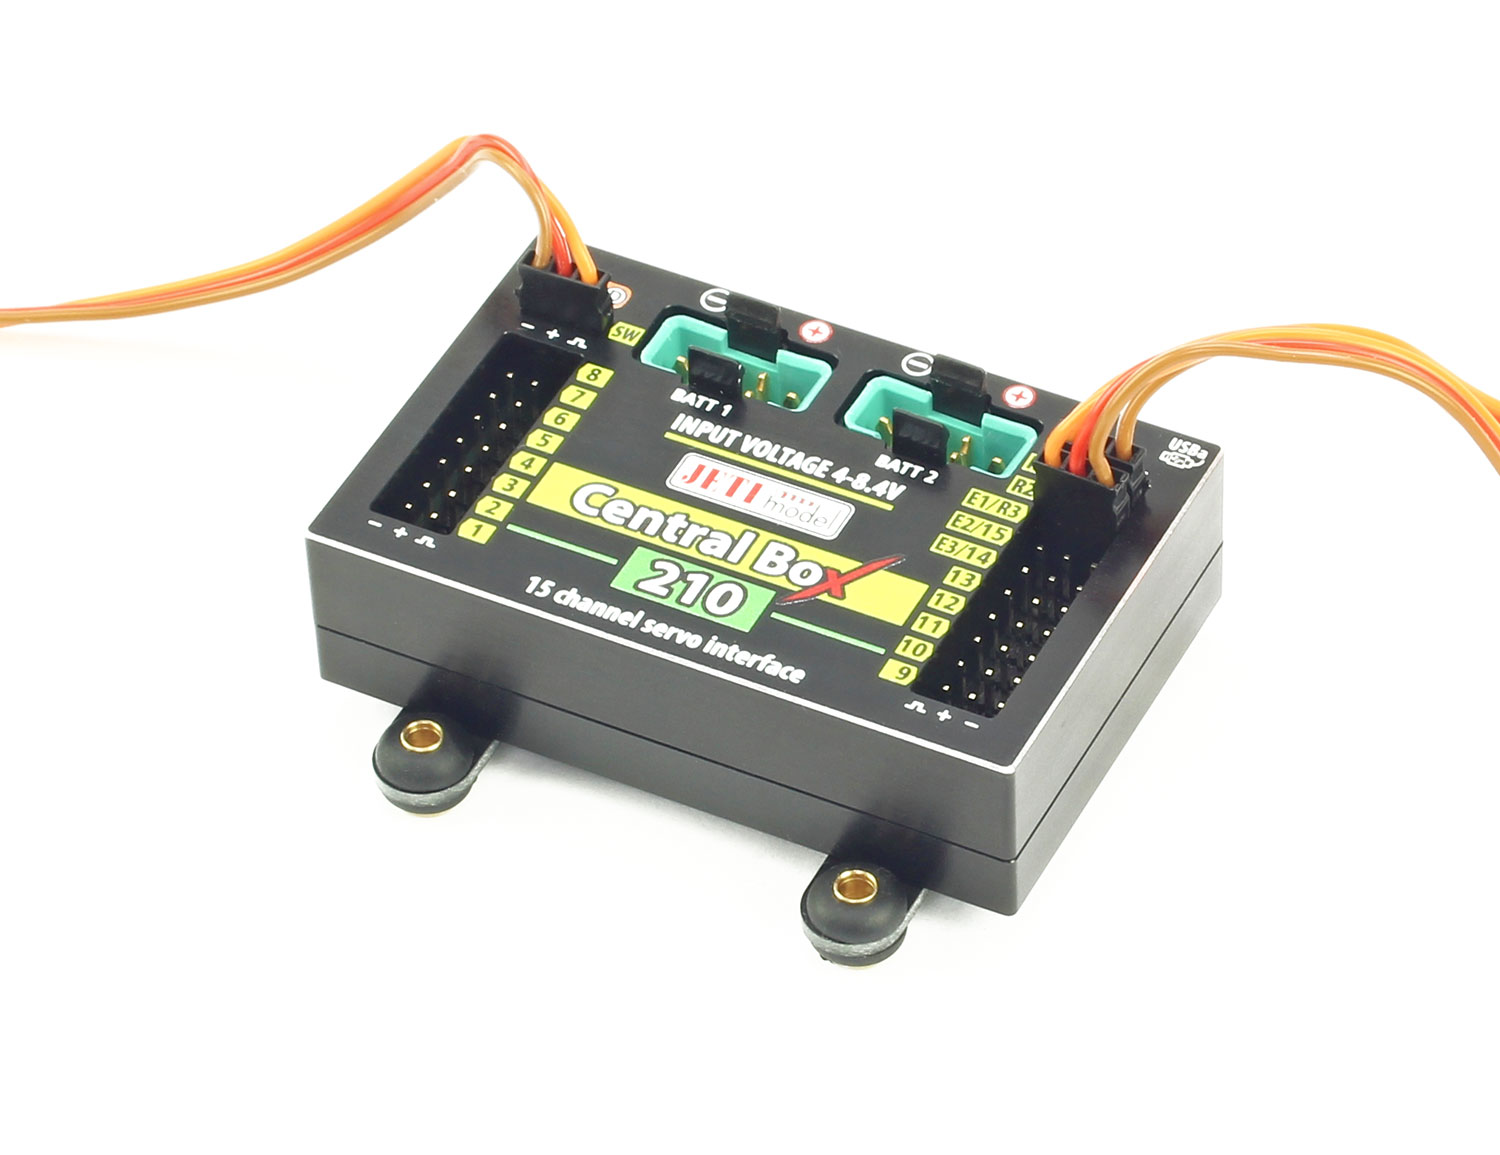
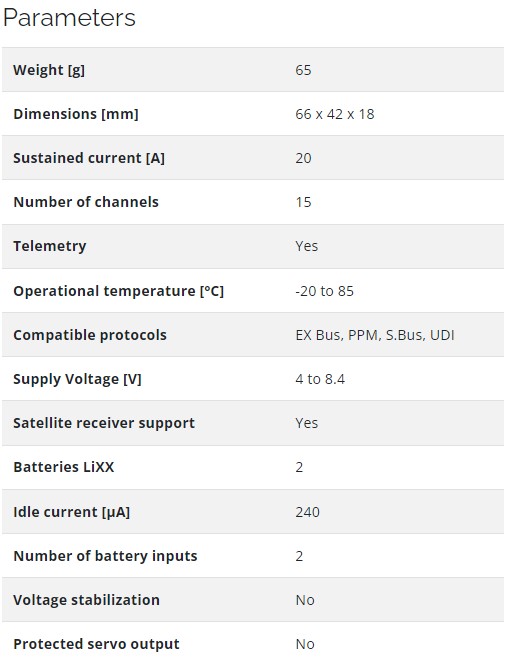
The CB210 is an ungraded version of the CB200, removing servo overload protection at each servo output and introducing a redesigned housing. The new housing is made out of aluminum which acts as a heat sink to help dissipate heat. It can manage, depending on your configuration, up to fifteen servos, up to three telemetry inputs, up to three receivers, (two 2.4gHz and one 900mHz), and two batteries (multiplex). In addition, the CB210 can be turned on/off with either a magnetic switch or wirelessly with the R3/RSW.
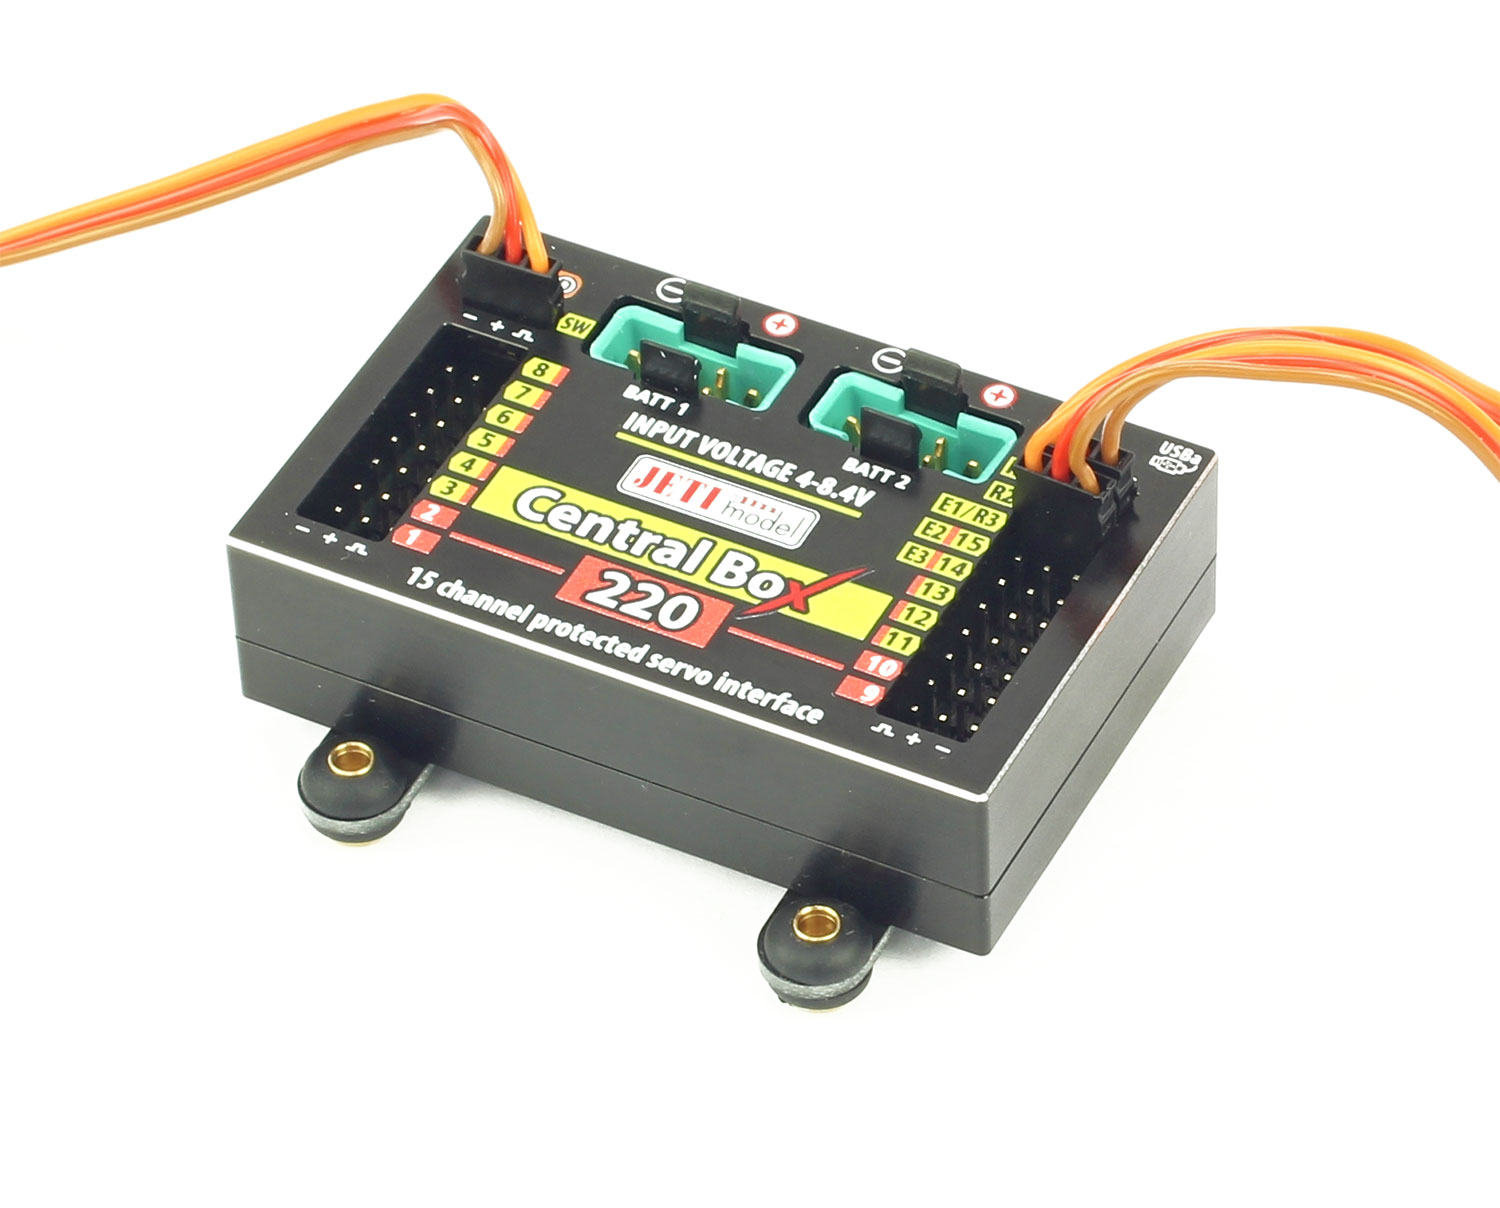
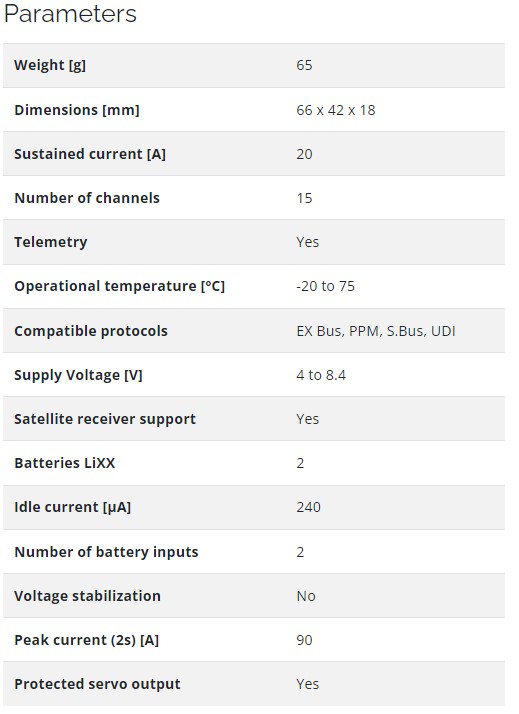
The CB220 is much like the CB210, but it has a unique design that provides overload protection for up to eleven standard and four ultra torque servos. It still has the aluminum housing, magnetic or wireless switching option, and can manage up to fifteen servos, three telemetry inputs, three receivers, and two batteries (multiplex).
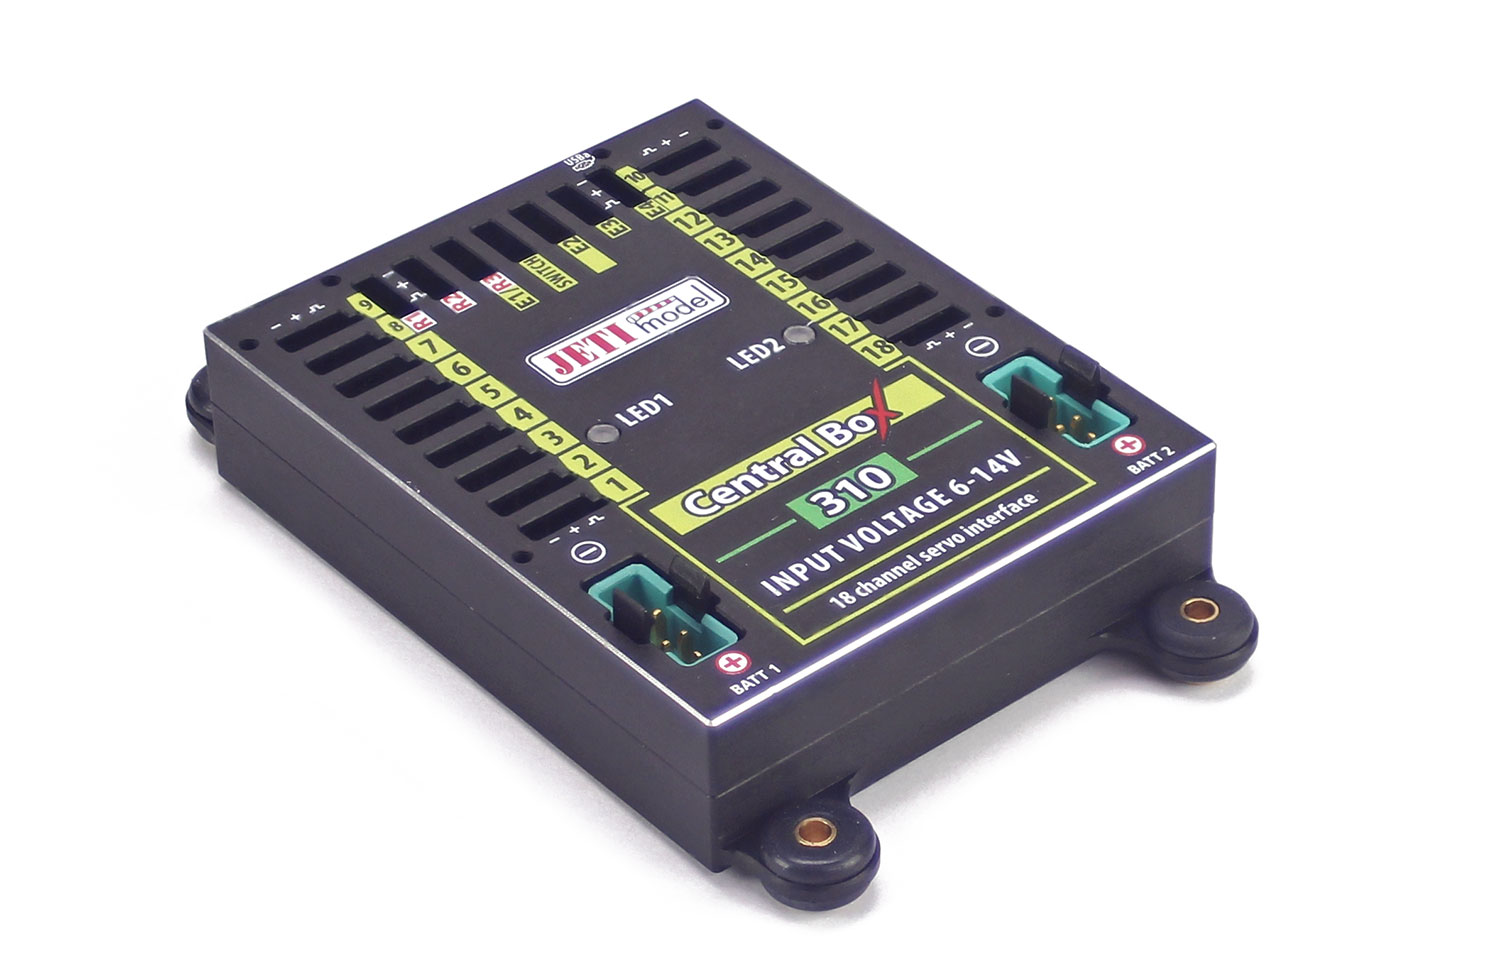
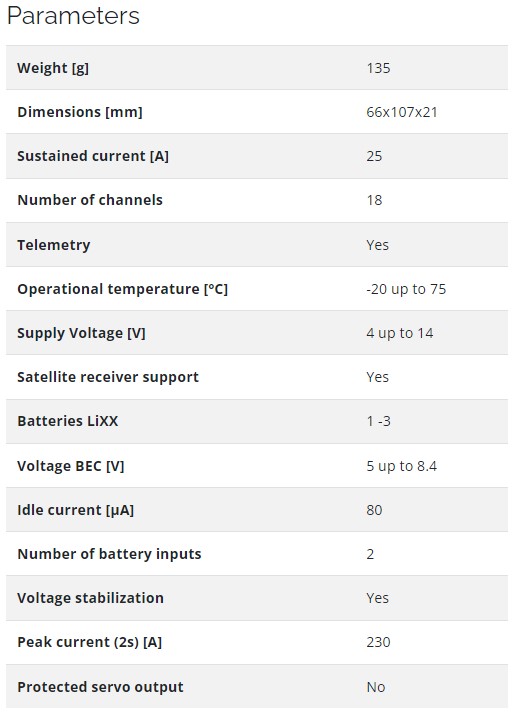
The CB310 builds on the capabilities of, the CB210. It offers the same aluminum housing, and as with the CB210, has been designed without servo overload protection, allowing it to work well in models utilizing very large servos with high current draws. In addition the CB310 has a built in voltage regulator. This Central Box can manage up to eighteen servos, four telemetry inputs, three receivers, two batteries (multiplex), and has the option for a magnetic or wireless switch.
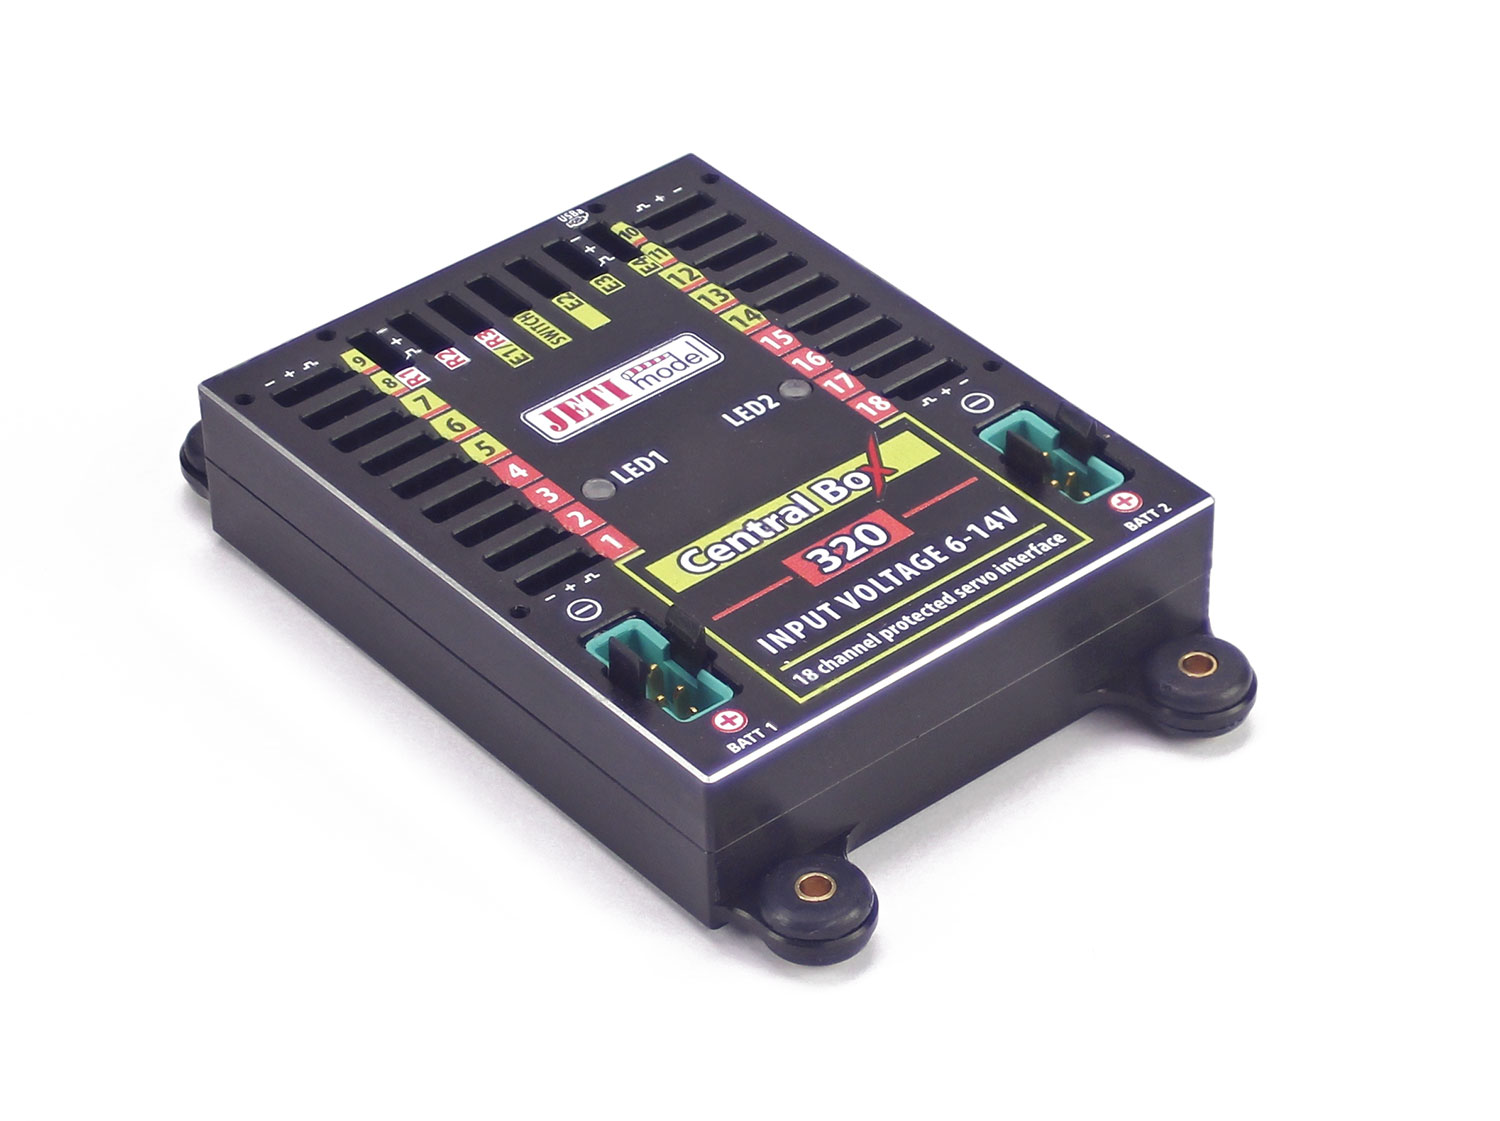
When it comes to the CB320, we see the same features of the CB310, but with the servo overload protection. The overload protection will provide protection for up to 10 standard servos and and 8 ultra torque servos.
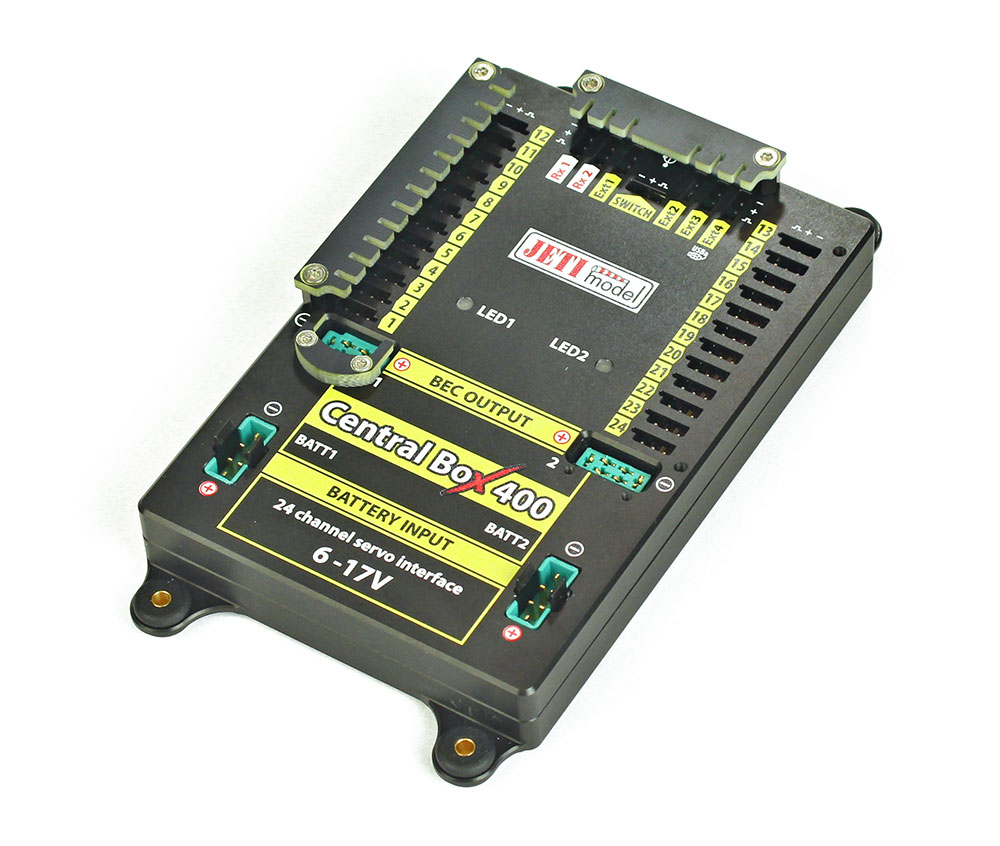
The CB400 has the most features of them all! This bad boy offers the aluminum case, two independent voltage regulators and can manage up to 24 servo outputs (with overload protection), four telemetry sensors, three receivers, and two battery inputs. In addition to the two battery inputs, it offers two battery outputs for powering certain devices such as special lights or your ignition.
There is definitely a lot these power distribution systems can do for you and your aircraft. Check out the entire product line for more detailed information here.
With so many Jeti telemetry sensors available, it can be quite overwhelming, especially if you are a new Jeti user, to know what might be beneficial to you. We decided that we could make that task less daunting by compiling the most recent list of Jeti sensors and briefly explaining what each one does. Follow along below.
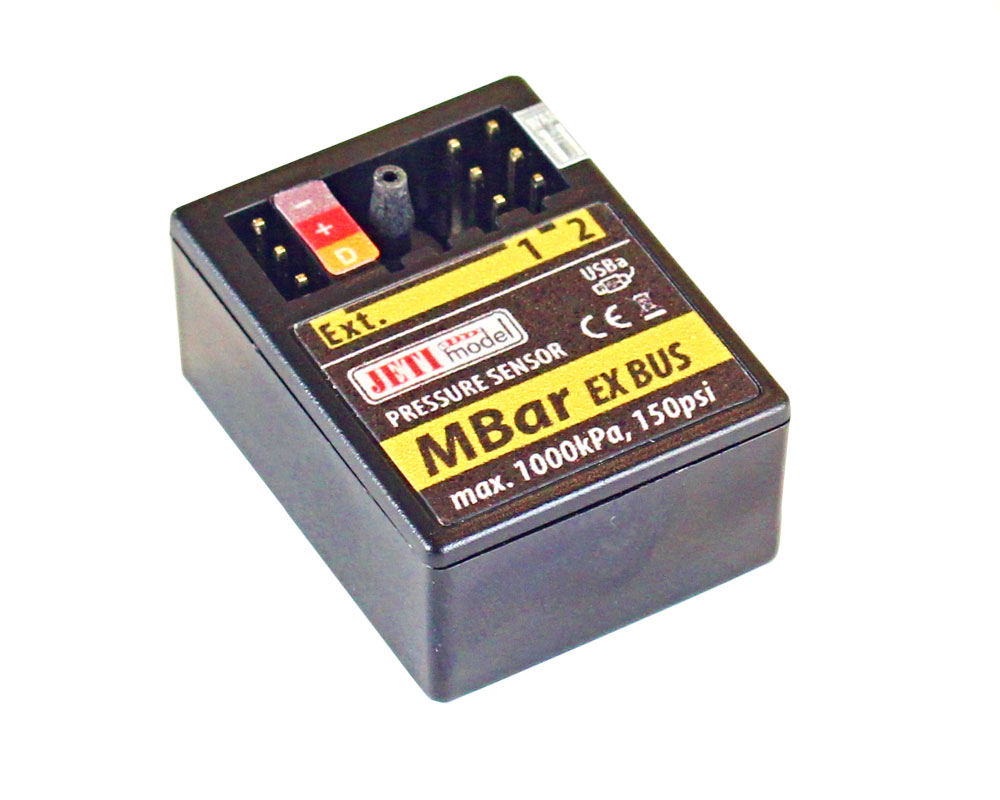
MBar – The MBar is an air pressure sensor. It will measure pressure of non-corrosive and non-ionized gases and liquids. The MBar sensor can be used for measuring pressure in containers with compressed air (retractable landing gear systems) or for controlling the oil pressure in hydraulic systems. Read more about the MBar EX Sensor here.
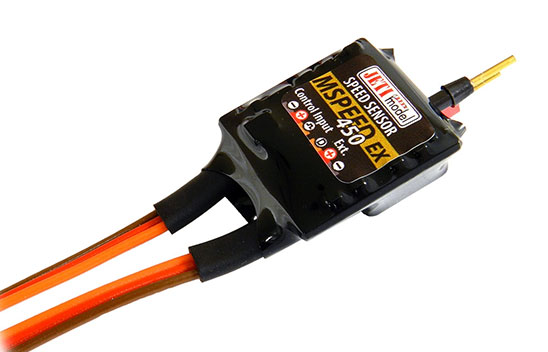
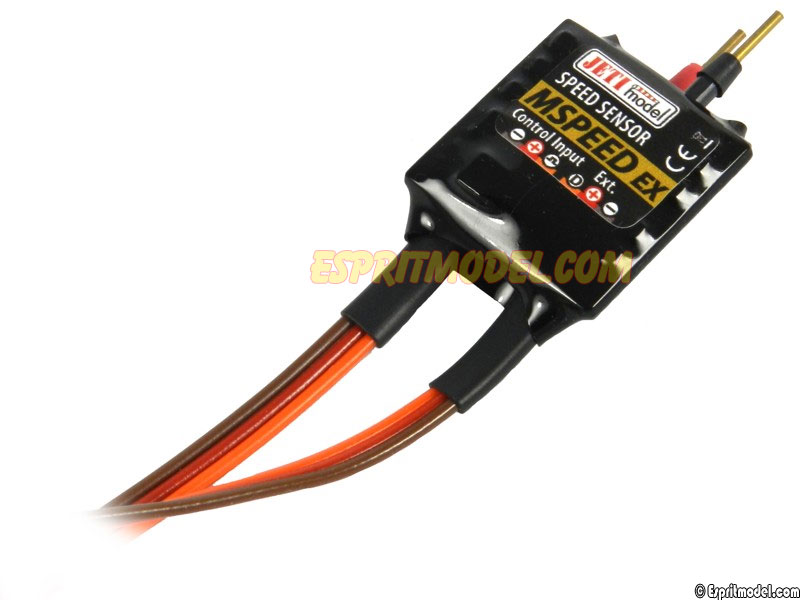
MSpeed and MSpeed 450 – Both of these sensors will give you the airspeed of your aircraft. They work using a pitot tube to measure the dynamic air pressure as you are in flight. The difference between the MSpeed and MSpeed 450 is simply the airspeed range that each will measure. The MSpeed450 is designed to be run in aircraft that fly at faster speeds, where as the MSpeed is designed for slower flying aircraft. Read more about the MSpeed here and the MSpeed 450 here.
MAlti – This sensor can provide calculated altitude above sea level, ambient fuselage air temperature, and air pressure data. These parameters are produced by measuring the atmospheric pressure. Since the MAlti is a very sensitive sensor, any slight change in altitude will result in a change in air pressure thus allowing calculation of how high above sea level your aircraft is. Read more here.
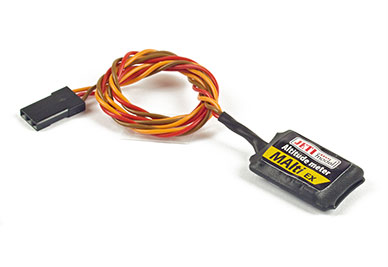
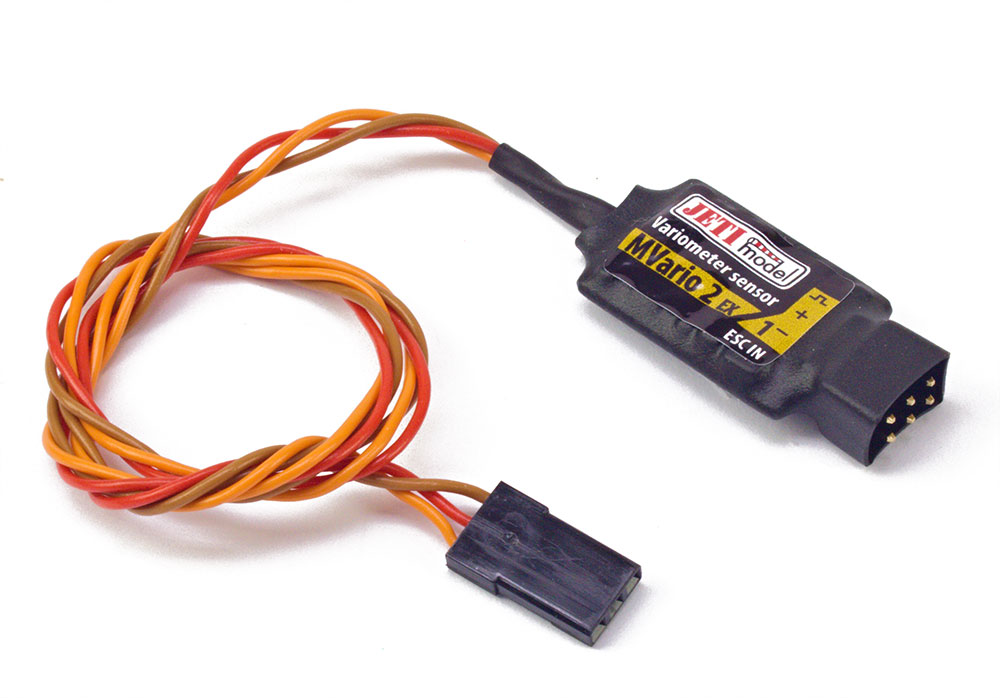
MVario2 – The Mvario2 is a system that measures atmospheric pressure and using the obtained data it calculates the altitude above sea level, airspeed, and the rate of climb as well as the rate of descent. Changes in climb and descent rates are signaled as well. The sensor also alerts you if any alarm setting is exceeded. The mvario2 will also work as an expander, allowing for connection of up to two additional sensors. Read more here.
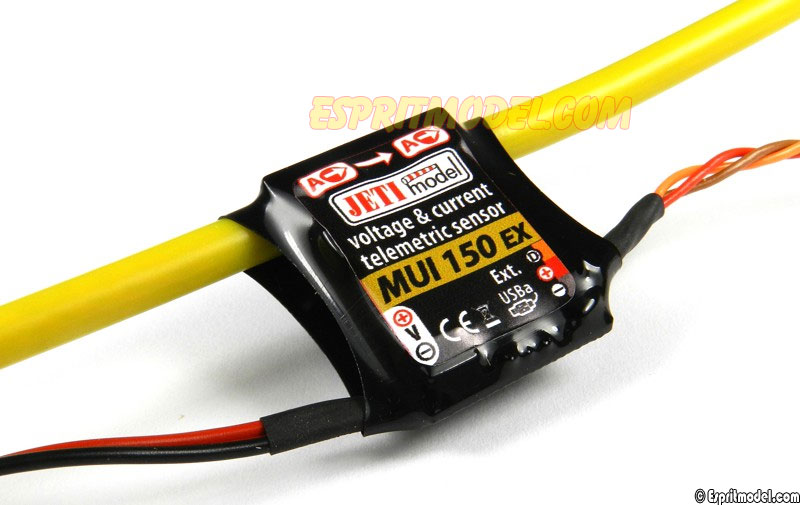
MUI – Our MUI sensors will measure voltage, current, and consumed battery capacity of your flight batteries. This sensor is available in five different amperage ranges, which are denoted by the number after the sensor. For example a MUI 30 will cover an amperage range of 0A to 30A, and a MUI 200 will cover a range of 0A to 200A. Find out more info here.
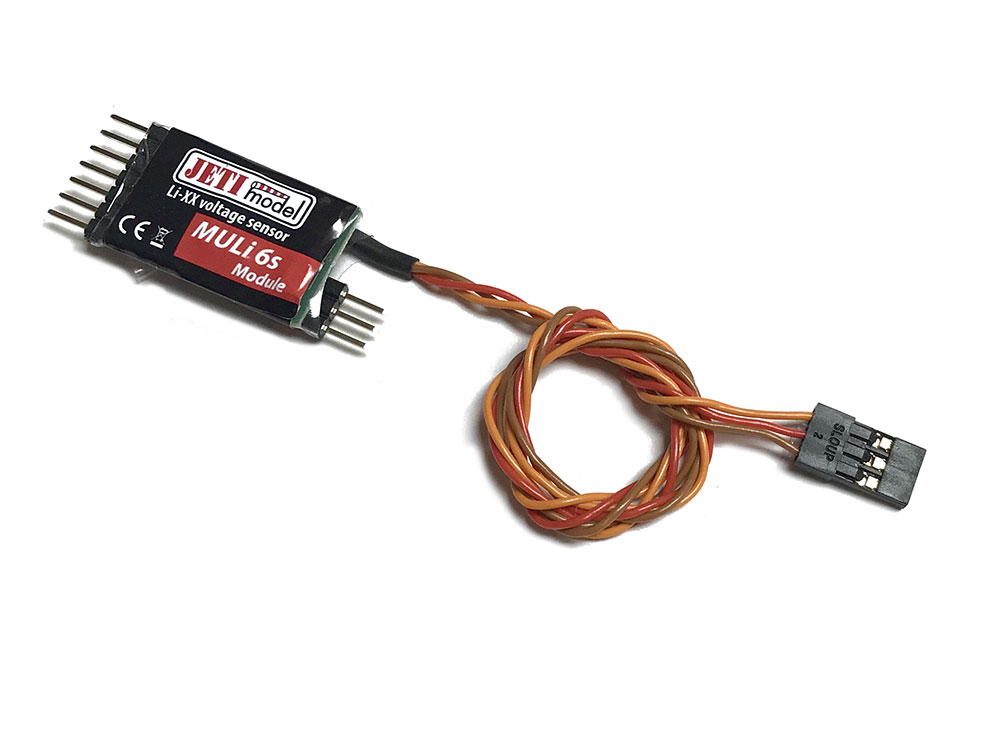
MULi 6s – The MULi 6s will measure the independent cell voltage (up to 6 cells) as well as total voltage of your lithium battery pack. Learn more here.
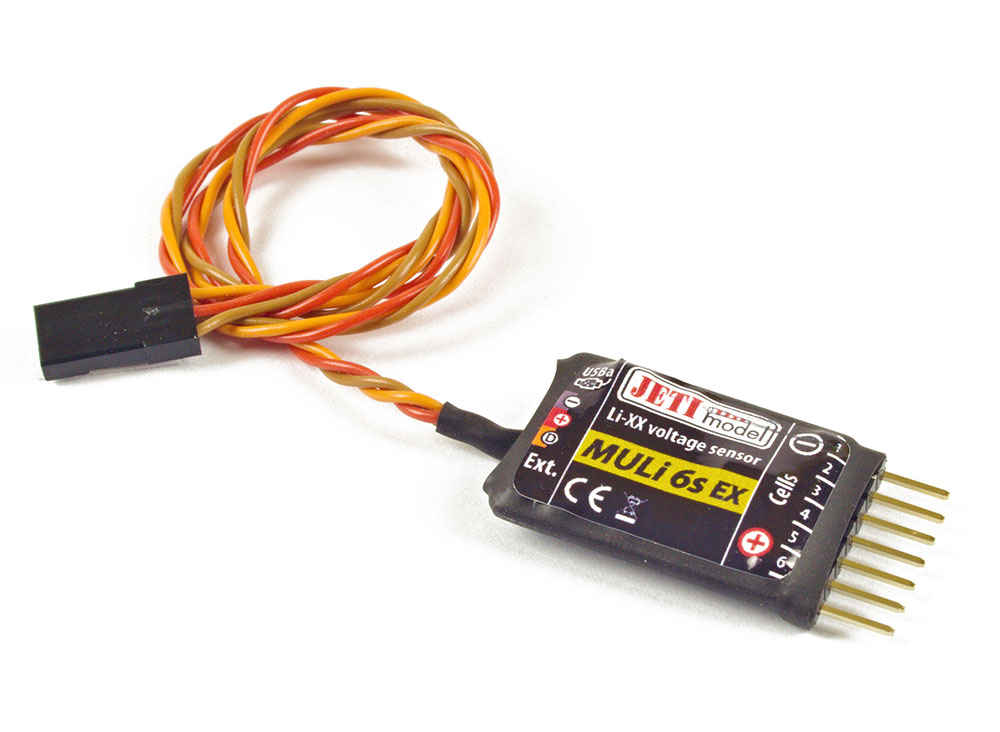
MULi 6s Module – The module version of the MULi 6s offers the same readings of independent cell voltage as well as total voltage of your lithium battery pack, but it is expandable by adding up to four additional modules. It can also be used as an expander for additional sensors. In addition to its expandability, the MULi 6s module offers cell voltage history and the difference between the strongest and the weakest cells. Read on about the sensor here.
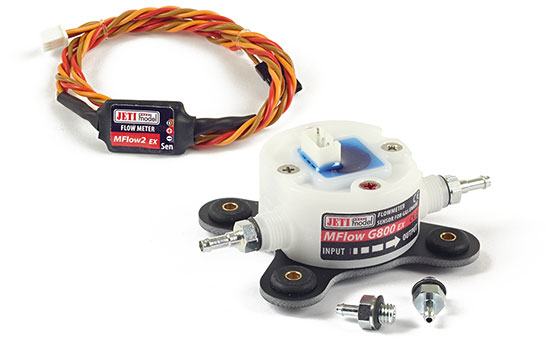
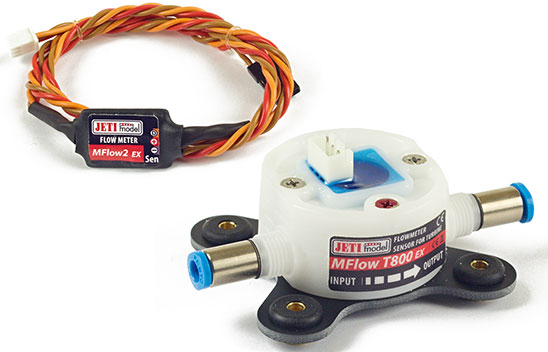
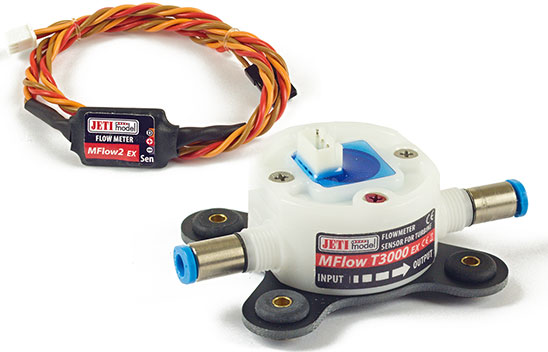
MFlow2 – The MFlow2 is our second generation fuel flow sensor. It will measure the true fuel flow of gasoline or turbine jet fuel. We offer three different versions: G800, T800 and T3000. The G800 is for gasoline engines and will measure a flow rate of 20 to 800 ml/min. The T800 is for turbine engines with a flow rate of 20 to 800 ml/min and the T3000 is for turbine engines with a faster flow rate range of 50 to 3000 ml/min. Read more here.
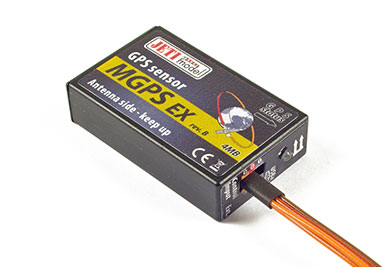
MPGS – By using the Global Positioning Satellite system (GPS), the MGPS is able to pinpoint the exact location of your model. The MGPS can use that data to calculate the speed, altitude, the course azimuth, point of origin, and distance traveled of your model. Learn more here.
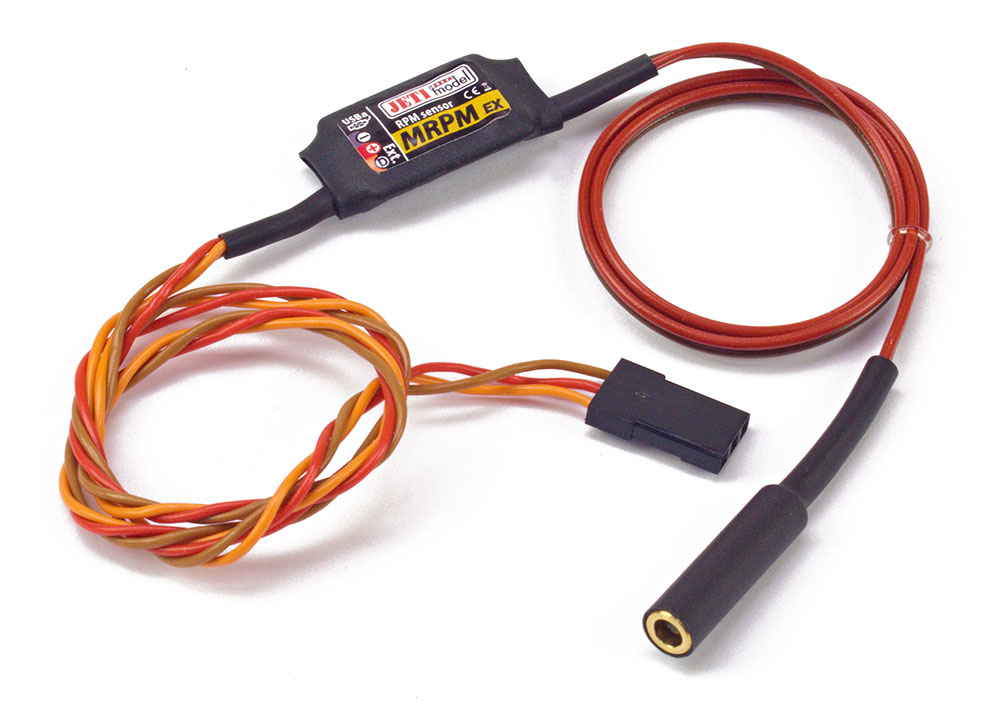
MRPM – The MRPM will measure the speed (Revolutions per minute, or RPM) of your models propeller optically. The optic sensor calculates RPM by monitoring the interruption of light (sunlight or incandescent light). Read more about this sensor on the page here.
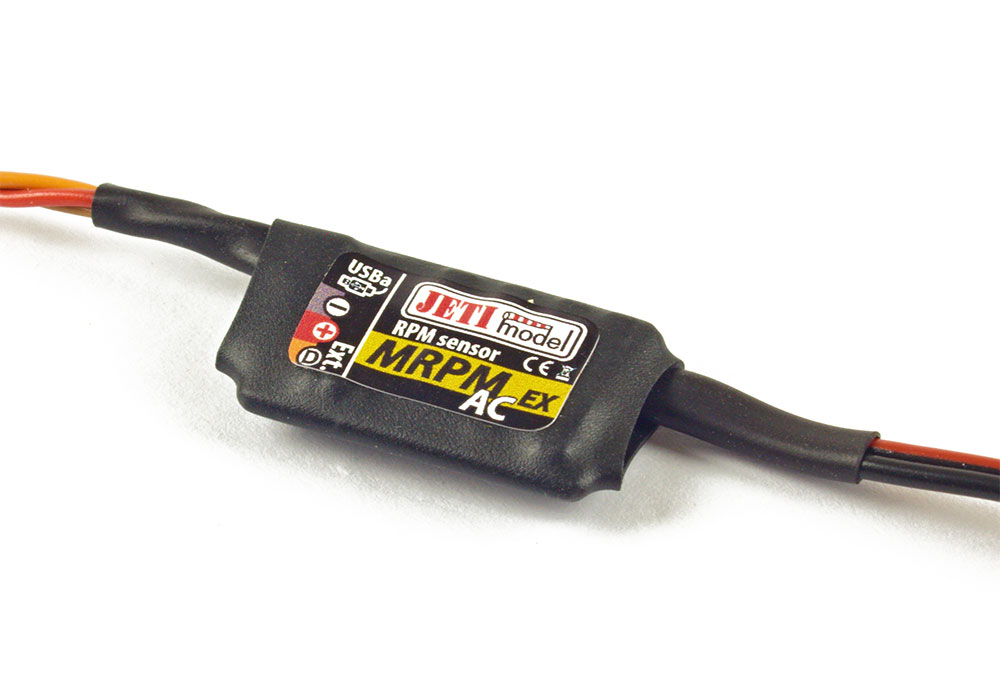
MRPM AC – The MRPM-AC will measure the speed (revolutions per minute, or RPM) of brushless motors through direct connection with two of the three motor wires (versus the previous Opto Sensor). Read more here.
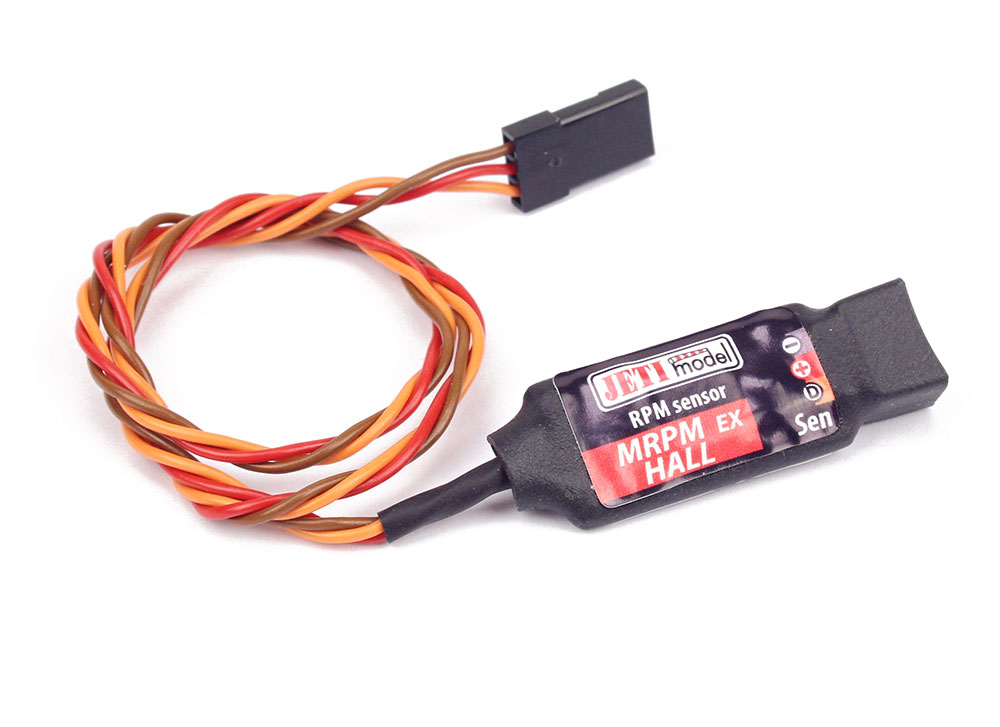
MRPM Hall – The MRPM Hall sensor provides RPM (revolutions per minute) and power level readings using magnetic Hall Effect and rare earth magnet. The MRPM HALL sensor measures the rotation speed and performance of the rotating surface. Read more here.
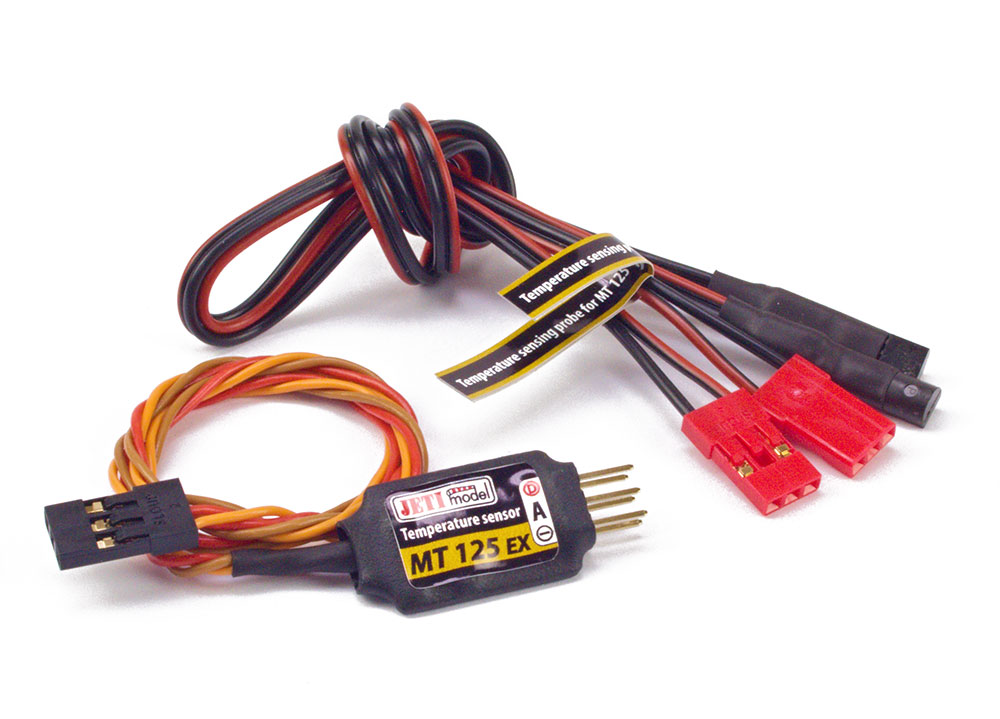
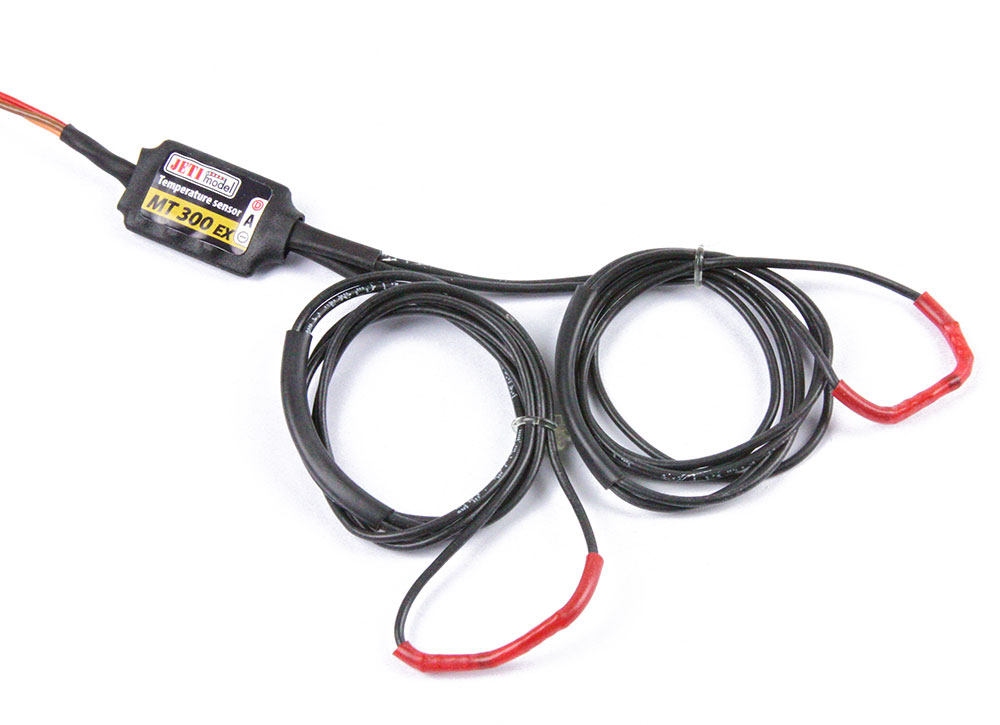
MT125 and MT300 – These sensors will monitor the temperature of whatever device you choose to place it around. It is, in simple terms, akin to a thermometer. The MT120 comes with two flat thermal probes, and the MT300 comes with two loop probes. Read about the MT125 here, and the MT300 here. Another difference between the two sensors is the range at which it will measure. The MT125 has a range of -55 to 125 degree Celsius, and the MT300 will operate at a range of -40 to 300 degree Celsius.
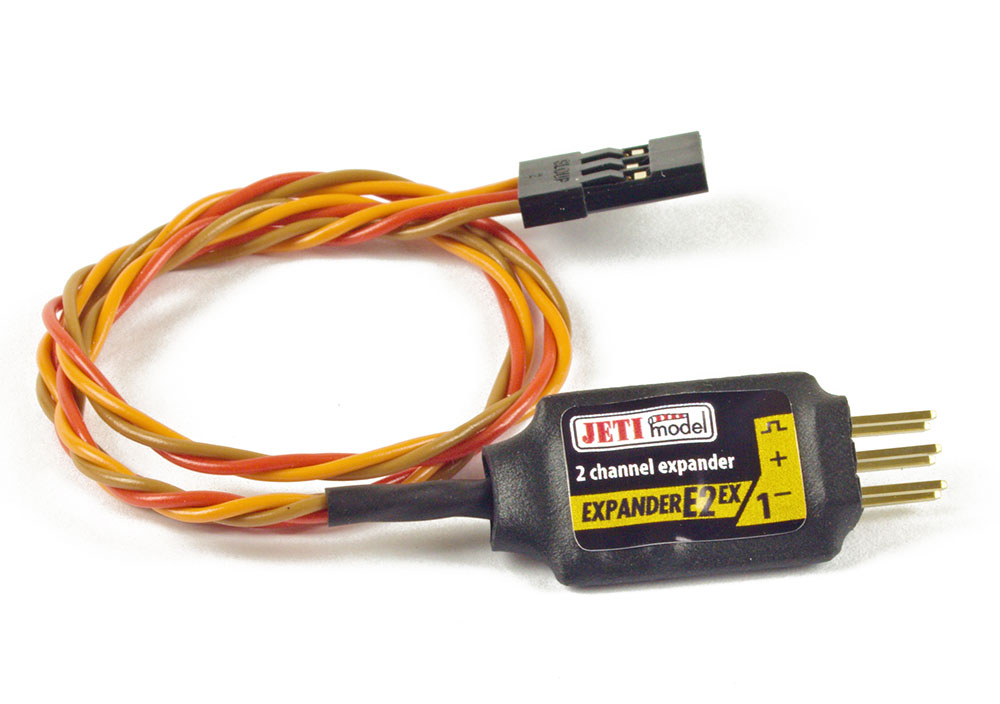
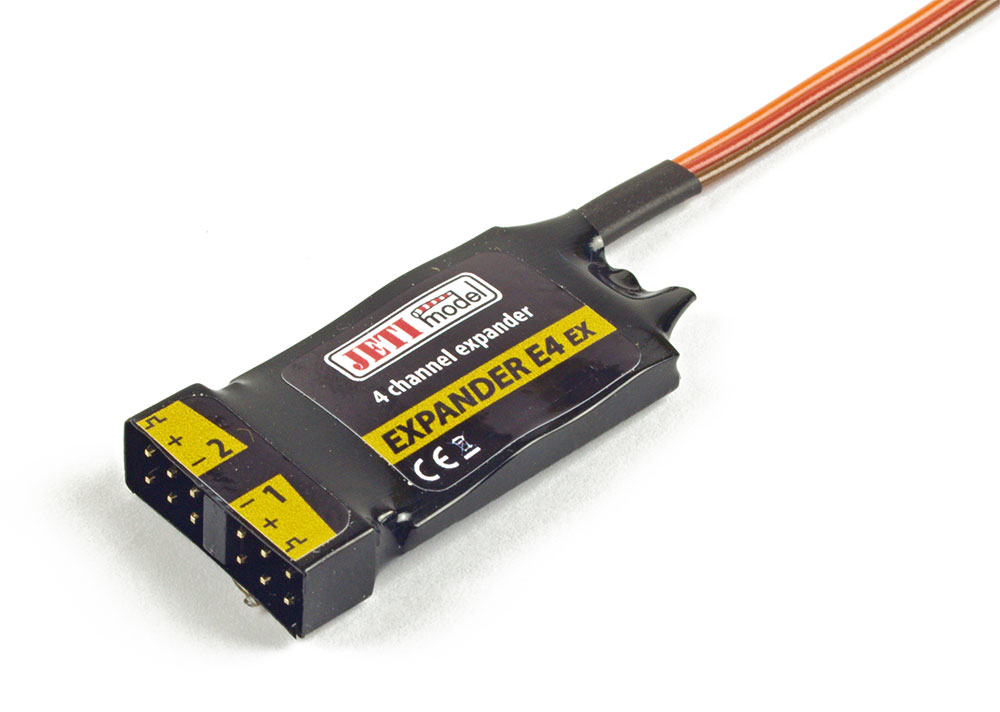
Expanders (E2, E4)– last but not least it is important to touch on the expanders. With so many sensors available, it is possible to run out of ports to connect them. The Jeti telemetry expander module allows you to increase the number of telemetry sensors in your aircraft. The E2 expander allows you to add up to two sensors and the E4 expander will allow for up to four sensors. Learn about the E2 here and the E4 here.

We discussed last week how the 900mhz backup feature is a highly recommended, under utilized feature, but we also want to talk about another feature that gets overlooked. With Jeti, as with most systems, you have the ability to set up a fail safe on your receiver. Fail Safe is a feature that tells your aircraft what to do in the case of a communication loss. This is important, because a communication loss can be catastrophic and cause an aircraft to do unexpected things. When you lose control of your aircraft, people can get hurt, and all of us want to avoid that scenario. To prevent such a series of events, you can set up a fail safe to carry out a specific task, like turning off your motor, in case of a communication loss. While this seems like a natural thing to do, many pilots are so excited to get a new model finished, this step is often overlooked. It can be the difference between a minor scare and a really bad day. Don’t forget to test the failsafe before you get to the field as you want to make sure it is functioning before you need it.
Check out this video on how to set up your fail safe.